Recently, I posted about swapping to 2G service which would move me from alt-optic gpon to xgs-pon and then allow me to fully bypass the ATT ont and not even use 802.11x configuration. I thought it was pretty detailed, but I was asked about some of the outputs during the setup. Fortunately, I kept the notes in my notepad instance and can expand on things. This is an addendum to the original article here.
When you start the process, you most likely have a laptop connected to the Azores ONT and one of the first things you will do is to login and change some settings in Azores to match your delivered RG. In my case, I was given a BGW320-500, which you will find is the HUMAX variant from the pon-madness guide. I took a picture of the bottom of my unit which had the gpon mac and the serial. The equipment ID is static based on the variant you have. You telnet in to the azores on port 23 using the test user to run some commands or telnet in on port 8009 which is a root shell with no login/password required (oof). I recorded my original settings, just in case. We start with normal telnet and the test user.
test
show gpon mac
show sn
show equipment id
After recording and saving this info, I proceeded to the next step of the guide which was to change the settings to clone my BGW320-500 via the root shell.
set gpon mac <mac from the bottom of the BGW320>
set sn HUMA<ONT serial number> <sub>!(you concatenate HUMA with the serial if it's not already done on your sticker)</sub>
fw_setenv img_versionA BGW320_3.21.4
fw_setenv img_versionB BGW320_3.21.4
set equipment id "iONT320500G"
Now we need to pop back into telnet on port 23 in the test config
test
config ONU-G_Version "BGW320-500_2.1"
Now we just reboot. At this time, I plugged in my fiber and once I could reach the unit again, I input pontop and pressed s. I checked the PLOAM line and saw what i was hoping for PON PLOAM Status : O5.1, Associated state A state of O5.1 indicates good connectivity to AT&T. The guide then suggested checking port status, by pressing g and then s, so I did.
GEM Index  GEM ID     Alloc Id   Alloc Id st.  Data/OMCI     Max. Size       Encryption k.r. Direction
0          20         20         Valid         OMCI          1980            Uni. DS         DS + US

1          65534      n.a.       Invalid       Ethernet      4096            None            DS

2          1087       1045       Valid         Ethernet      4096            Uni. DS         DS + US

3          1088       1045       Valid         Ethernet      4096            Uni. DS         DS + US

4          1089       1045       Valid         Ethernet      4096            Uni. DS         DS + US

5          1090       1045       Valid         Ethernet      4096            Uni. DS         DS + US

6          65533      n.a.       Invalid       Ethernet      4096            None            DS
I am pretty sure at this point I could simply stop and have full service, but I collected the remaining data the guide discussed. I bolded the commands and just dump the output below for you to see.
root@prx321-sfu-qspi-pon:/# cat /tmp/portvlan.log
Port 01: 2522    0
Port 02:
root@prx321-sfu-qspi-pon:/# omci_pipe.sh meg 84 4354 && omci_pipe.sh meg 84 4363
Class ID    = 84 (VLAN tagging filter data)
Instance ID = 4354
Upload      = yes
Alarms      = -
-------------------------------------------------------------------------------
 1 VLAN filter list             24b STR  RWS----P---
   0x09 0xda 0x00 0x00 0x00 0x00 0x00 0x00 0x00 0x00 0x00 0x00 0x00 0x00 0x00 0x00 0x00 0x00 0x00 0x00 0x00 0x00 0x00 0x00
   \x09\xDA\x00\x00\x00\x00\x00\x00\x00\x00\x00\x00\x00\x00\x00\x00\x00\x00\x00\x00\x00\x00\x00\x00
-------------------------------------------------------------------------------
 2 Forward operation             1b ENUM RWS--------
   0x10 (16)
-------------------------------------------------------------------------------
 3 Number of entries             1b UINT RWS--------
   0x01 (1)
-------------------------------------------------------------------------------
R - Readable          O - Not supported (optional)
W - Writable          E - Excluded from MIB upload (template)
S - set-by-create     T - Table
A - Send AVC          V - Volatile
U - No upload         P - No swap
N - Not supported     Y - Partly supported

errorcode=0
Class ID    = 84 (VLAN tagging filter data)
Instance ID = 4363
Upload      = yes
Alarms      = -
-------------------------------------------------------------------------------
 1 VLAN filter list             24b STR  RWS----P---
   0x09 0xda 0x00 0x00 0x00 0x00 0x00 0x00 0x00 0x00 0x00 0x00 0x00 0x00 0x00 0x00 0x00 0x00 0x00 0x00 0x00 0x00 0x00 0x00
   \x09\xDA\x00\x00\x00\x00\x00\x00\x00\x00\x00\x00\x00\x00\x00\x00\x00\x00\x00\x00\x00\x00\x00\x00
-------------------------------------------------------------------------------
 2 Forward operation             1b ENUM RWS--------
   0x10 (16)
-------------------------------------------------------------------------------
 3 Number of entries             1b UINT RWS--------
   0x01 (1)
-------------------------------------------------------------------------------
R - Readable          O - Not supported (optional)
W - Writable          E - Excluded from MIB upload (template)
S - set-by-create     T - Table
A - Send AVC          V - Volatile
U - No upload         P - No swap
N - Not supported     Y - Partly supported

errorcode=0
The next command was to verify dot1x auth status and it’s a lot of output, you can see it in the guide, but I’ll just show the snippet that matters.
root@prx321-sfu-qspi-pon:/# omci_pipe.sh meg 290 257 && omci_pipe.sh meg 290 258
##257##
-------------------------------------------------------------------------------
 1 Dot1x enable                  1b UINT RW---------
   0x01 (1)
##258##
-------------------------------------------------------------------------------
 1 Dot1x enable                  1b UINT RW---------
   0x00 (0)
Finally after all this, I also wanted to ensure future ssh connectivity, even though I didn’t disable telnet at all. The guide section “SSH using dropbear” covers this
root@prx321-sfu-qspi-pon:/# rm -rf /etc/dropbear/dropbear_rsa_host_key
root@prx321-sfu-qspi-pon:/# dropbearkey -t rsa -f /etc/dropbear/dropbear_rsa_host_key
Generating 2048 bit rsa key, this may take a while...
Public key portion is:
ssh-rsa AAAAB3NzaC1yc2EAAAADAQABAAABAQCxDQUJaBI6ininb0w0AiA0e1CjNqVKVxJhFpHNHnUzdYc8y+vfRlp7nbXAEXBtBhnd8WDlrRZwCHjWjI0k+pMRN0tL8d/sczhlkm52FFS63lUiDc5gLpzrgmZ9oaYZMFId/mxsuA8sw7wZj3PWlFNFdkDhgxaIavAQdRSdyVErc15KF2ECkaxSOyea/Ue4C/iUYM+qf+g8N8yOOVk2Y4OVE6mmzgakzRRMQwCibZNS/8Btwo5Yf+wfVDROcsaAgx2elt8Pf+i3bAPIOTqe2DaZ+MsDSp9GCR+Uog3z1Szjffgq2T+APzZqAO8eSJjrT85Sh9AZQ0B4nQ2qyhD2GGN1 root@prx321-sfu-qspi-pon
Fingerprint: sha1!! 45:a9:16:2f:96:df:93:dd:4a:ec:24:00:27:ed:45:ea:7f:83:02:df
root@prx321-sfu-qspi-pon:/# dropbear -B -r /etc/dropbear/dropbear_rsa_host_key
root@prx321-sfu-qspi-pon:/#  ps | grep dropbear
30479 root      1132 S    <em>dropbear -B -r /etc/dropbear/dropbear_rsa_host_key</em>
30931 root      1408 R    grep dropbear
At this point, I connected my router and waited. After about 5 minutes, I had internet. I also wanted to ensure connectivity to the azores, so I configured an alias on the WAN port, created an outbound NAT rule, and created a static arp entry. I’ll start with the static arp entry, I just did it the normal freeBSD way, but I haven’t actually tested persistence yet.
root@opnsense:/usr/local/etc/rc.d # sysrc static_arp_pairs="azores"
static_arp_pairs:  -> azores
root@opnsense:/usr/local/etc/rc.d # sysrc static_arp_azores="192.168.1.1 <mac address>"
static_arp_azores:  -> 192.168.1.1 <mac address>
root@opnsense:/usr/local/etc/rc.d # service static_arp start
Binding static ARP pair(s): azores.
root@opnsense:/usr/local/etc/rc.d # arp -a | grep 192.168.1.1
? (192.168.1.1) at <mac address> on igc0 permanent [ethernet]
Now I created the alias IP on the WAN interface.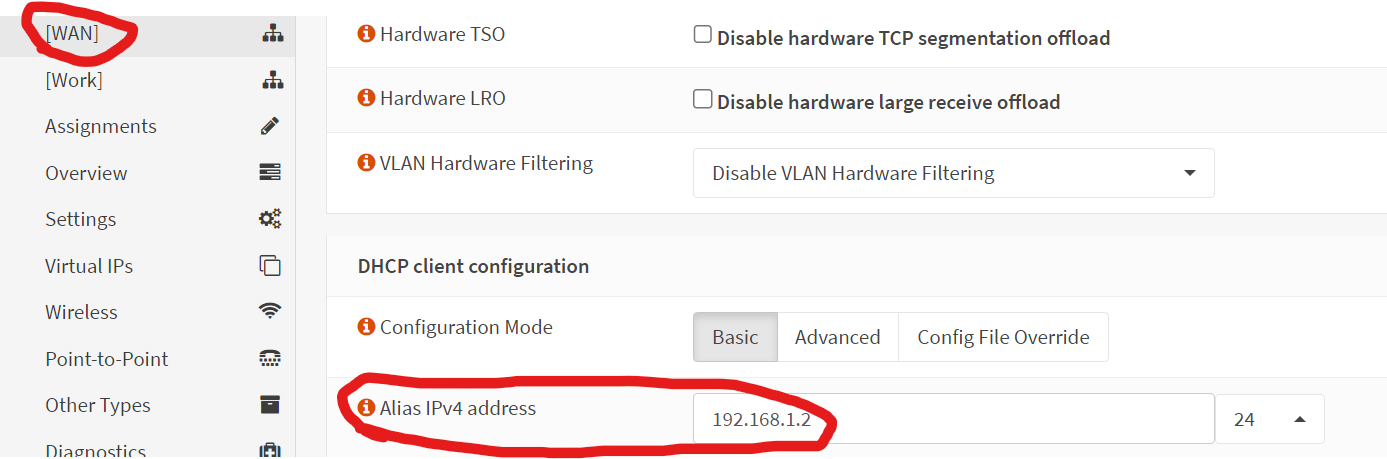
Finally, I created the outbound NAT rule. I’m not sure if this is absolutely needed, but it seems logical that it would be. Note that my translation target is the alias IP I set above, not the interface address or anything else. My destination is the azores gw, and in my case, I only allow this outbound nat rule to work for my LAN vlan.

After all that, we need to test. I first try to ssh to the unit
dznet-kms ~ # ssh [email protected]
The authenticity of host '192.168.1.1 (192.168.1.1)' can't be established.
RSA key fingerprint is SHA256:tfHYRgsueWGRwi2JM/Z2Rce5Grzm3QBAvakH+ljzzi0.
Are you sure you want to continue connecting (yes/no/[fingerprint])? yes
Warning: Permanently added '192.168.1.1' (RSA) to the list of known hosts.
[email protected]'s password:


BusyBox v1.30.1 () built-in shell (ash)

----------------------------------------------------------------------
 OpenWrt (v19.07.2_maxlinear) - (1.14.0) - Intel Edition
----------------------------------------------------------------------
root@prx321-sfu-qspi-pon:~#
Next, I try to reach the webui which is how we handle firmware upgrades.
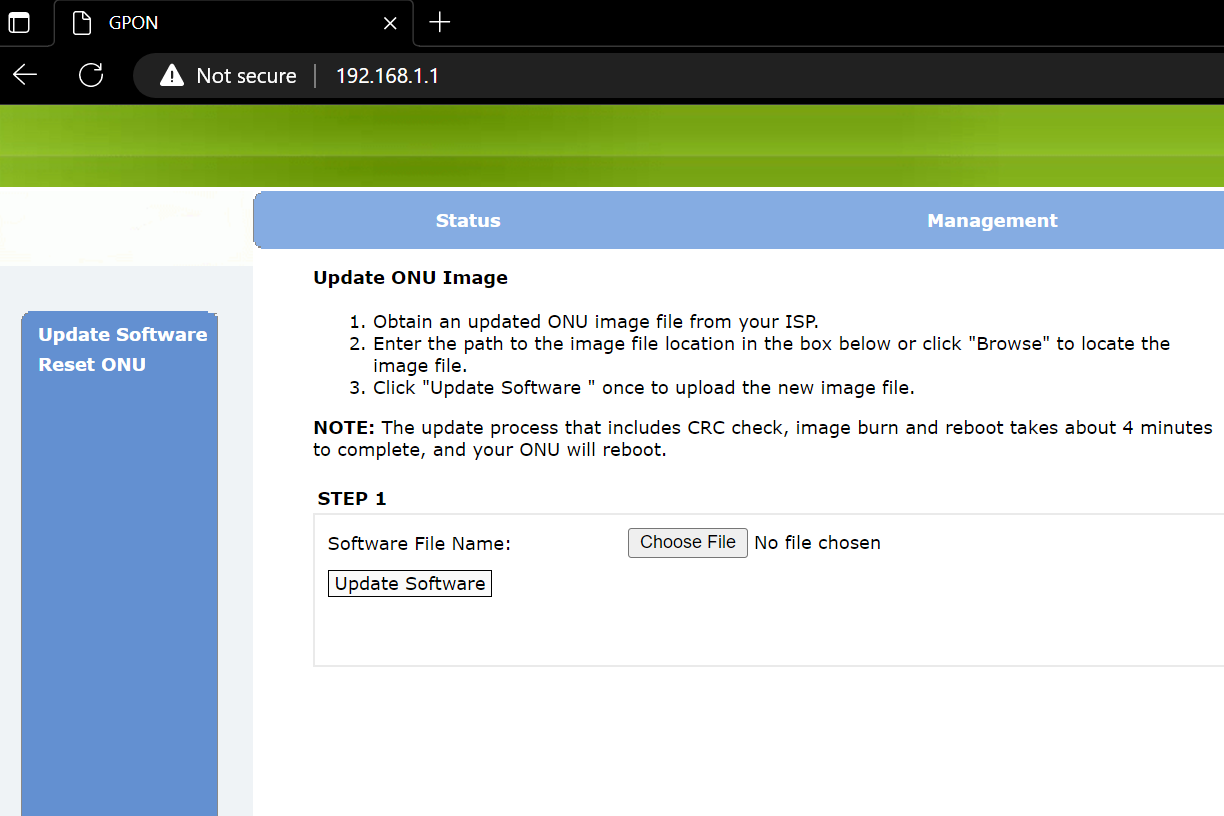
At this point, I am good to go as far as what I wanted to accomplish.