It’s been quite a while since my last post, but I wanted to cover something I had tinkered with a few times and finally got to a state I’m ok with. IPv6 in docker containers. For my testing, I will be using linuxserver.io containers, as being part of the team allows me to easily fix anything that prevents full functionality.
I guess to start, a big thing I found is most ipv6 guides, including the official documentation, tells you how to enable ipv6 for the default bridge. As we all know, the default bridge is trash, it doesnt work like a custom bridge and causes a number of issues. You may also see guides that lead you to setup nds proxy which works, but it introduces a HUGE amount of latency. When I tested the NDS proxy method, i couldn’t stand how slow it was and quickly reverted the change. So, let’s get into how I set it up, note that I am not claiming to have the best method, the most efficient method, the most secure method or anything of the sort. This is just how I set it up to get what I wanted working in a way I was OK with.
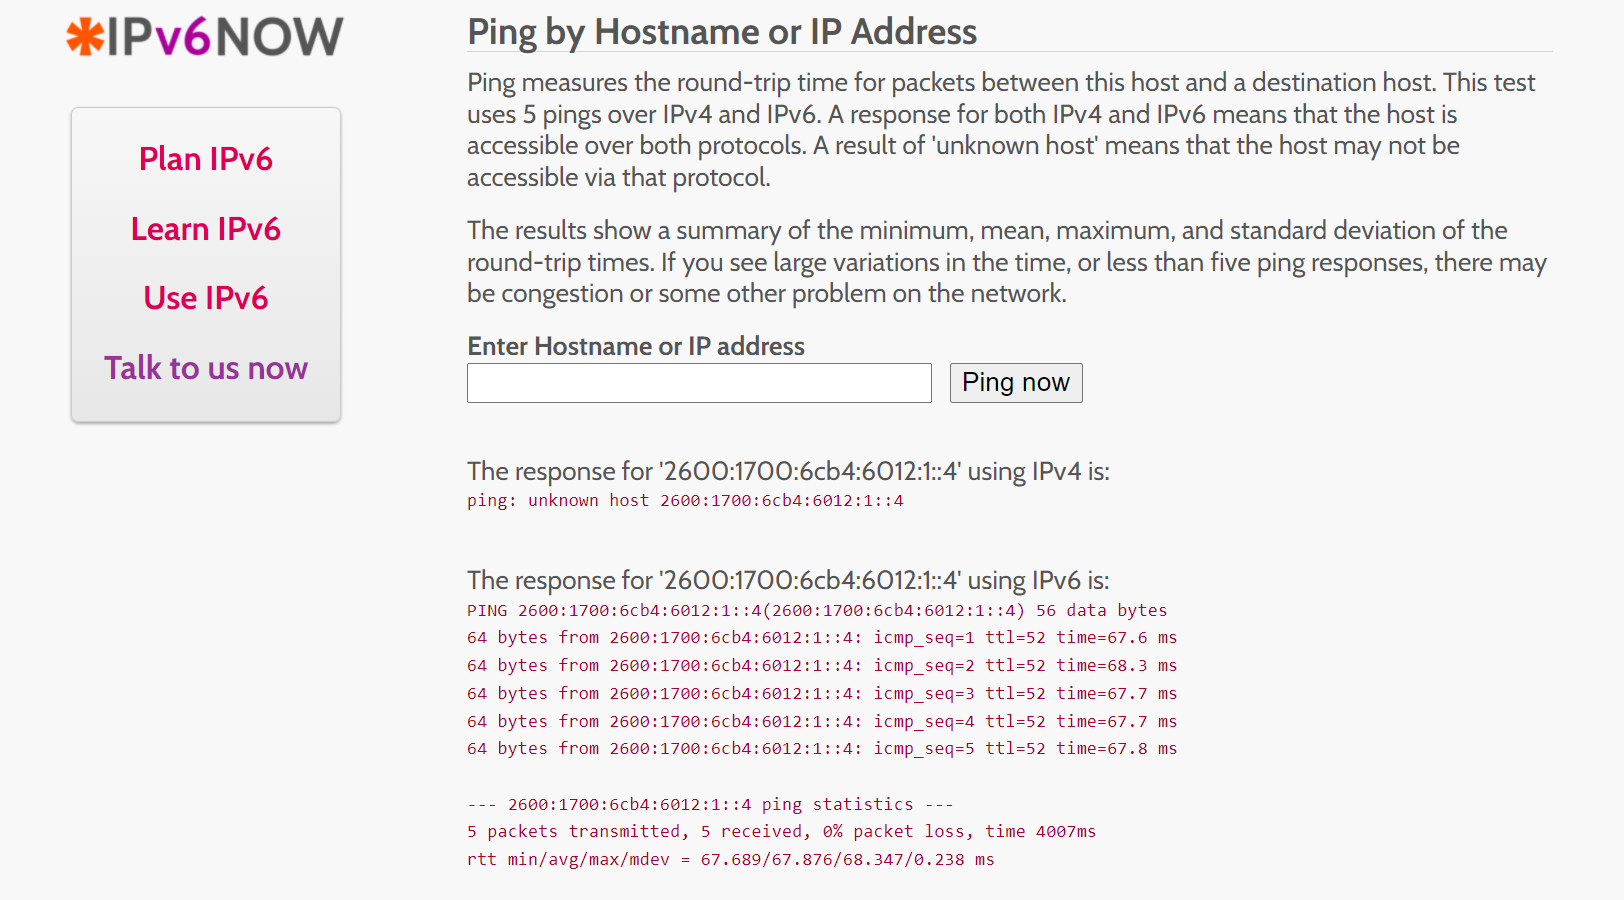
In my case, my ISP issues me a /64 subnet for IPv6. I’m using prefix delegation to get it to my network and everything works fine. Before you deep dive, ensure your docker host has a valid ipv6 ip address and can reach the internet. Below is my test of connectivity.
4: bond0: <BROADCAST,MULTICAST,MASTER,UP,LOWER_UP> mtu 9000 qdisc noqueue state UP group default qlen 1000
    inet6 2600:1700:6cb4:6012:9090:b2ff:fe1a:c197/64 scope global dynamic mngtmpaddr
       valid_lft 84892sec preferred_lft 12892sec
    inet6 fe80::9090:b2ff:fe1a:c197/64 scope link
       valid_lft forever preferred_lft forever

dznet-nas ~ # ping6 2001:4860:4860::8888
PING 2001:4860:4860::8888(2001:4860:4860::8888) 56 data bytes
64 bytes from 2001:4860:4860::8888: icmp_seq=1 ttl=115 time=11.9 ms
64 bytes from 2001:4860:4860::8888: icmp_seq=2 ttl=115 time=11.9 ms
^C
--- 2001:4860:4860::8888 ping statistics ---
2 packets transmitted, 2 received, 0% packet loss, time 1002ms
rtt min/avg/max/mdev = 11.867/11.904/11.942/0.037 ms
As you can see, I have a valid IPv6 address and I am able to ping google’s DNS from it. You can also pause at this point to ensure that your firewall is properly configured to 1) block things you want blocked and 2) allow things you want to allow. In my case, I’m allowing ports 80 and 443 to reach my nginx container SWAG
My next step was to decide how I want to carve things up, a /64 is PLENTY of ip space for me, so I just took a /112 out of the block. If you’re a network type, you’re thinking that this will cause a routing issue on the LAN, it will, I’ll get to that later. From my 2600:1700:6cb4:6012::/64 i carved out 2600:1700:6cb4:6012:1::/112 specifically for containers. To use this though, we need to create a custom bridge. Following that, I added this new bridge to my swag container in my docker-compose.yml. I started the container and verified the IP address from my new pool was present. I created a static route on my WAN edge router (which in my case is a Ubiquiti Edgerouter), and then I then pinged this IP from my gateway.
docker network create --ipv6 --subnet 2600:1700:6cb4:6012:1::/112 ipv6
!
  swag:
    image: lscr.io/linuxserver/swag
    container_name: swag
    cap_add:
      - NET_ADMIN
    networks:
      - dznet
      - ipv6
    environment:
      - PUID=${PUID}
      - PGID=${PGID}
      - TZ=${TZ}
      - URL=${DOMAIN}
      - SUBDOMAINS=wildcard
      - VALIDATION=dns
      - DNSPLUGIN=cloudflare
      - STAGING=false #optional
      - DOCKER_MODS=linuxserver/mods:letsencrypt-imagemagick|linuxserver/mods:swag-cloudflare-real-ip
      - MAXMINDDB_LICENSE_KEY=${MAXMINDKEY}
    volumes:
      - ${CONFDIR}/swag:/config
      - ${CONFDIR}/bwdata/logs:/extlogs/bitwarden:ro
      - ${CONFDIR}/authelia/authelia.log:/extlogs/authelia.log:ro
      - ${TIME}:${TIME}:ro
    ports:
      - 443:443
      - 80:80
    restart: unless-stopped

!
dznet-nas ~ # docker inspect swag | grep '"GlobalIPv6Address": "2600'
                    "GlobalIPv6Address": "2600:1700:6cb4:6012:1::4",
The next steps from here was to create a static route on my router to reach this /112 and then test connectivity. In my case, I am using a Ubiquiti Edgerouter, so your mileage may vary, but below is my command to create the static route.
set protocols static route6 2600:1700:6cb4:6012:1::/112 next-hop 2600:1700:6cb4:6012:9090:b2ff:fe1a:c197 description "docker ipv6"
driz@dznet-gw# ping 2600:1700:6cb4:6012:1::4
PING 2600:1700:6cb4:6012:1::4(2600:1700:6cb4:6012:1::4) 56 data bytes<br>64 bytes from 2600:1700:6cb4:6012:1::4: icmp_seq=1 ttl=63 time=0.513 ms
64 bytes from 2600:1700:6cb4:6012:1::4: icmp_seq=2 ttl=63 time=0.320 ms
^C
--- 2600:1700:6cb4:6012:1::4 ping statistics ---
2 packets transmitted, 2 received, 0% packet loss, time 1069ms
rtt min/avg/max/mdev = 0.320/0.416/0.513/0.098 ms
Note that the next-hop address is the IPv6 of my docker host, we’re sending all traffic destined for the /112 to the docker host. As you can see above, everything is working as expected here. From a meeting my needs perspective, this level of latency was perfectly acceptable and of course, reachable from the gateway. However, from a flat network perspective, this /112 is not reachable from the LAN. This is because the LAN thinks it’s on a /64 and isn’t going to the router to reach the /112. It’s keeping this all layer2. Creating a static route on all the lan machines will fix this, but for me, it doesn’t matter, I only care about the internet reaching these addresses.
Now that everything is working internally how I needed it to, I wanted to check that I could reach the container directly from the WAN.
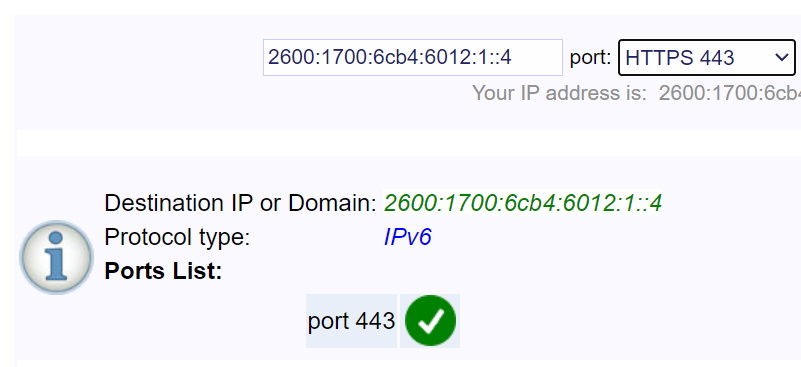
As you can see in the above image, using an ipv6 ping website, I was able to directly reach my SWAG container. While you don’t need to leave icmp enabled for this to work, I have. You will also notice that port scanners see 443 as listening on the proper IP address.
Let’s discuss security real quickly. We do not go in to detail on your edge firewall, ensure you set it up properly. SWAGs fail2ban (if you’re using a version after my commit fixing it) will support banning ipv6. This will also work with cloudflare banning via fail2ban if you’ve set this up. So let’s look at that next. To test this, I know my cell phone has ipv6 when not on wifi, so I turned off my wifi and attempted to login to one of my hosted websites via swag. I input the wrong information 3 times which triggers fail2ban, below are the results.
2022-01-11 11:47:05,146 fail2ban.filter         [575]: INFO    [authelia] Found 2607:fb90:25da:dc3b:4284:9f5e:5791:30a8 - 2022-01-11 11:47:04
2022-01-11 11:47:08,350 fail2ban.filter         [575]: INFO    [authelia] Found 2607:fb90:25da:dc3b:4284:9f5e:5791:30a8 - 2022-01-11 11:47:08
2022-01-11 11:47:12,356 fail2ban.filter         [575]: INFO    [authelia] Found 2607:fb90:25da:dc3b:4284:9f5e:5791:30a8 - 2022-01-11 11:47:11
2022-01-11 11:47:12,519 fail2ban.actions        [575]: NOTICE  [authelia] Ban 2607:fb90:25da:dc3b:4284:9f5e:5791:30a8

dznet-nas ~ # docker exec -it swag ip6tables -vnL f2b-authelia
Chain f2b-authelia (1 references)
 pkts bytes target     prot opt in     out     source               destination
    0     0 REJECT     all      *      *       2607:fb90:25da:dc3b:4284:9f5e:5791:30a8  ::/0                 reject-with icmp6-port-unreachable
   17  5392 RETURN     all      *      *       ::/0                 ::/0
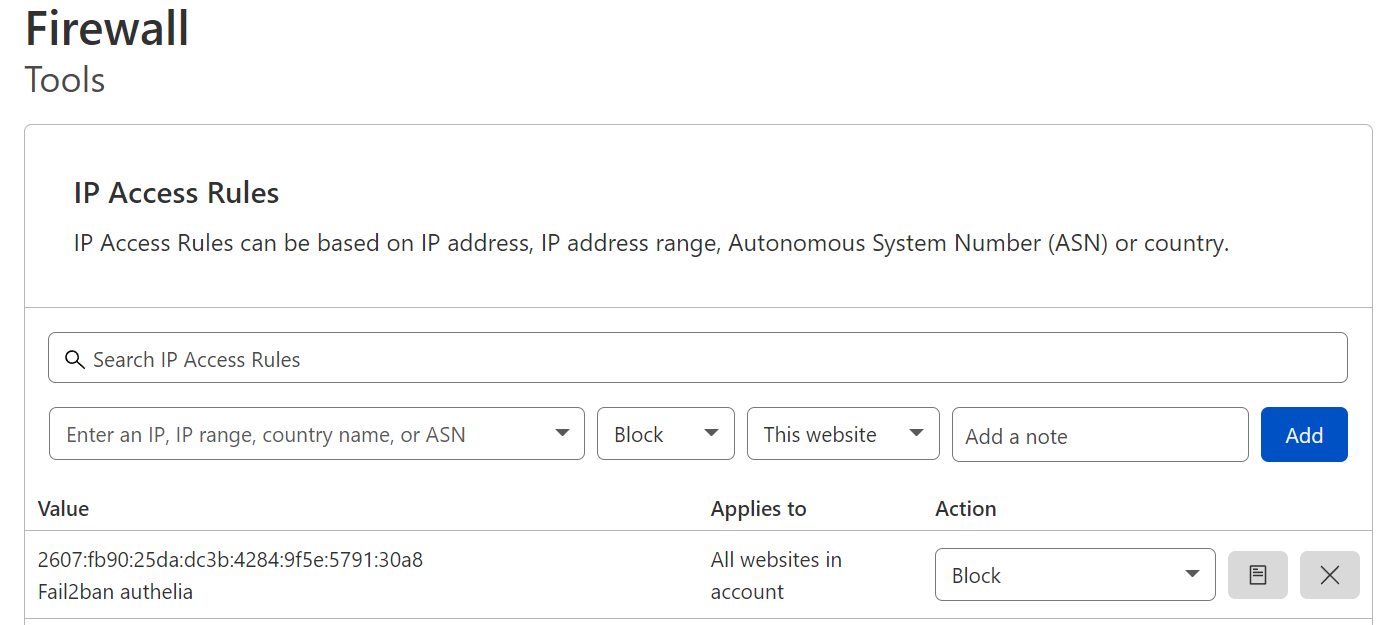
As you can see, fail2ban caught the attempts and created the rule to block this attacker. You can see the rule injected into ip6tables successfully. Further, I have configured my cloudflare to ban based on fail2ban as well, so I verified the ban was present on cloudflare as well.
As you can see, I have everything working how I wanted it to. SWAG is reachable from the WAN via ipv6 and is able to proxy to my applications while also protecting my apps via fail2ban. While the LAN issue reaching this may be a pain for some users, I blocked external lookup of my domains internally to prevent ipv6 resolution, this forces my internal traffic to rely on the ipv4 replies my internal DNS server provides. If I were to consider some options for making this work, i guess creating a vlan on my router to get another /64 would work, then, since it’d be a different subnet, the LAN would send the traffic to the router and route to the other subnet, following the static route. I haven’t really put much thought into this and I haven’t tested, but I’m sure with some effort, this would work, it’s just not something I need and thus, I have no plans to work on it.