I’ve been planning on doing this transition for a bit, but I wanted to get things in place and ensure I had a solid plan before executing. I’ll discuss what I had, my plan, and what I moved to here a bit. If any of you have read my previous post, AT&T Uverse RG Bypass, then you know I am a big fan of bypassing the ATT provided RG to use my own equipment. With my 1000/1000 service, the fiber (alt optic unfortunately) came into the ATT ONT, directly to my router (initially ERL3, later ER4) which then went to my core switch to my access switches. The plan initially began to form because rather than faking the 802.1x on my router, I could instead use my own ONT and fully bypass everything ATT had in my home. Some people can do this with GPON 1G or less service, but in the former bellsouth areas, we had alt optic which uses a 1550nm wavelength rather than 1490nm wavelength, so the GPON bypass wasn’t possible for me. My plan was to get a 2.5G+ capable router with sufficient disk, memory, and cpu to handle routing at whatever speed I went with. I ordered two devices: A GW-R86S-G2, and an N6005/4xi226-V

The biggest differences between the two is the 86S has 2 SFP+, but you can’t add/change memory/disk, while the other device has only 2.5G ports, but you can put whatever memory/disk you want in. In my area, for gig+, I can have 1G/1G, 2G/2G, or 5G/5G. For the bypass, I needed an Azores WAG-D20, as it’s the only device reportedly working on ATT XGS-PON fiber. So, after ordering my routers, the memory, nvme, and azores, I decided to order my upgraded service. I selected 2G/2G because honestly, not many places will even let me use the full bandwidth, but this gets me on XGS-PON and then I can downgrade back to 1G. I feel I should mention what I put in the 2.5G box, so that was a Micron 8GB kit (2x4GB) and a Patriot P300 gen3 NVME at 256GB. It supposedly has low heat ouput and low power, which should work well for this fanless router.
After plenty of research, I decided that I would try out OPNSense and move away from vyatta (what ubiquiti uses on usg/edgerouter). As a brand new user to OPNSense, I was pretty excited to get to tinker and learn something new. We’ll fast forward to install day. The Tech showed up and patched me over to the XGS-PON side and came to the house. He took the Nokia G-010G-A ONT out and gave me a BGW320-500 which is an ONT, Router, Wifi, and switch combo unit. After setting it up, below is the initial speedtest of my 2000/2000 service.
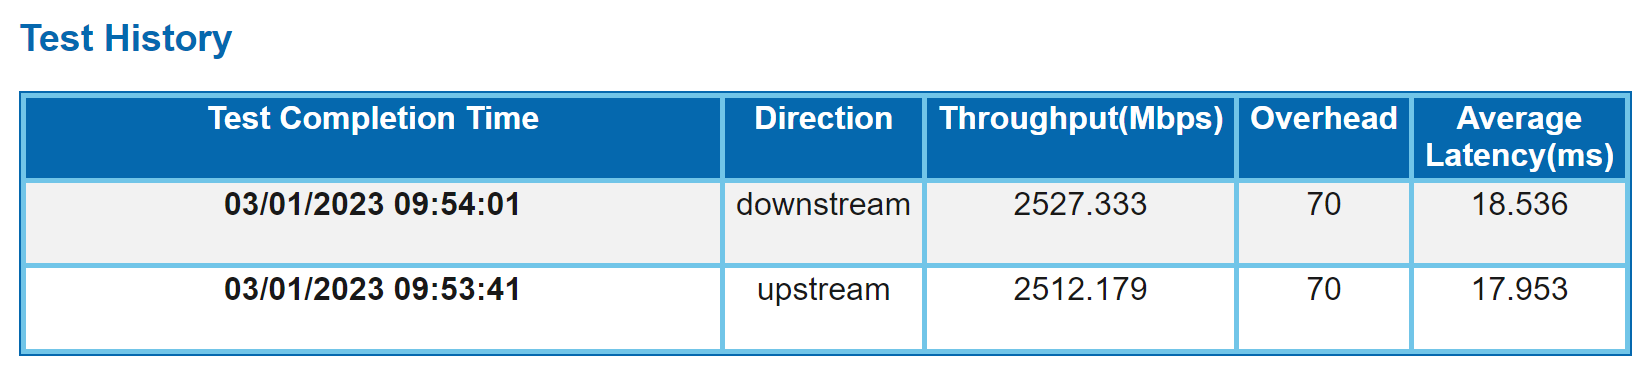
Needless to say, I was pretty impressed, 2500/2500 on my 2000/2000 service. The tech cleaned up and left and I took the 320 out of service. I installed my Azores and shelled in. Thanks to the CPE bypass server discord I was able to follow a very well written document to setup the Azores. I configured the settings and within a couple minutes, I had o5.1 connectivity on the fiber which meant I was good to go! It was extremely simple. My next steps were to connect to my router and begin setting up opnsense, which I neglected to pre-stage (oops.) I installed opnsense using a USB stick and started setting things up. It was a pretty simple process, I configured the WAN port (which quickly got an IP) and my LAN port which I left at 192.168.1.254 to start. I statically assigned an IP and testing connectivity and verified things were working. Now I needed to setup it up properly.
In my home, I have a few VLANs. Voice, LAN, IoT, NOWAN, Work, and Guest. The names are sufficiently descriptive, so I won’t go into detail here. The UI is pretty easy to navigate, so I found under Interfaces -> Other Types -> Vlan, that I could create my vlans and assign an interface. I created my vlans, set the tags, configured DSCP for the voice vlan, and hit apply. There was no where to configure an IP, so i checked the documentation. I found I needed to assign the interfaces, so back to Interfaces -> Assignments. Here I was able to enable and configure the interfaces. First I removed the IP from the IGC3 interface (which was the default LAN) and renamed it to be “ToSwitch”. It needs to be enabled since it’s the parent interface for the VLANs. Then I configured my VLANs. Here is what my LAN interface looked like after completion.
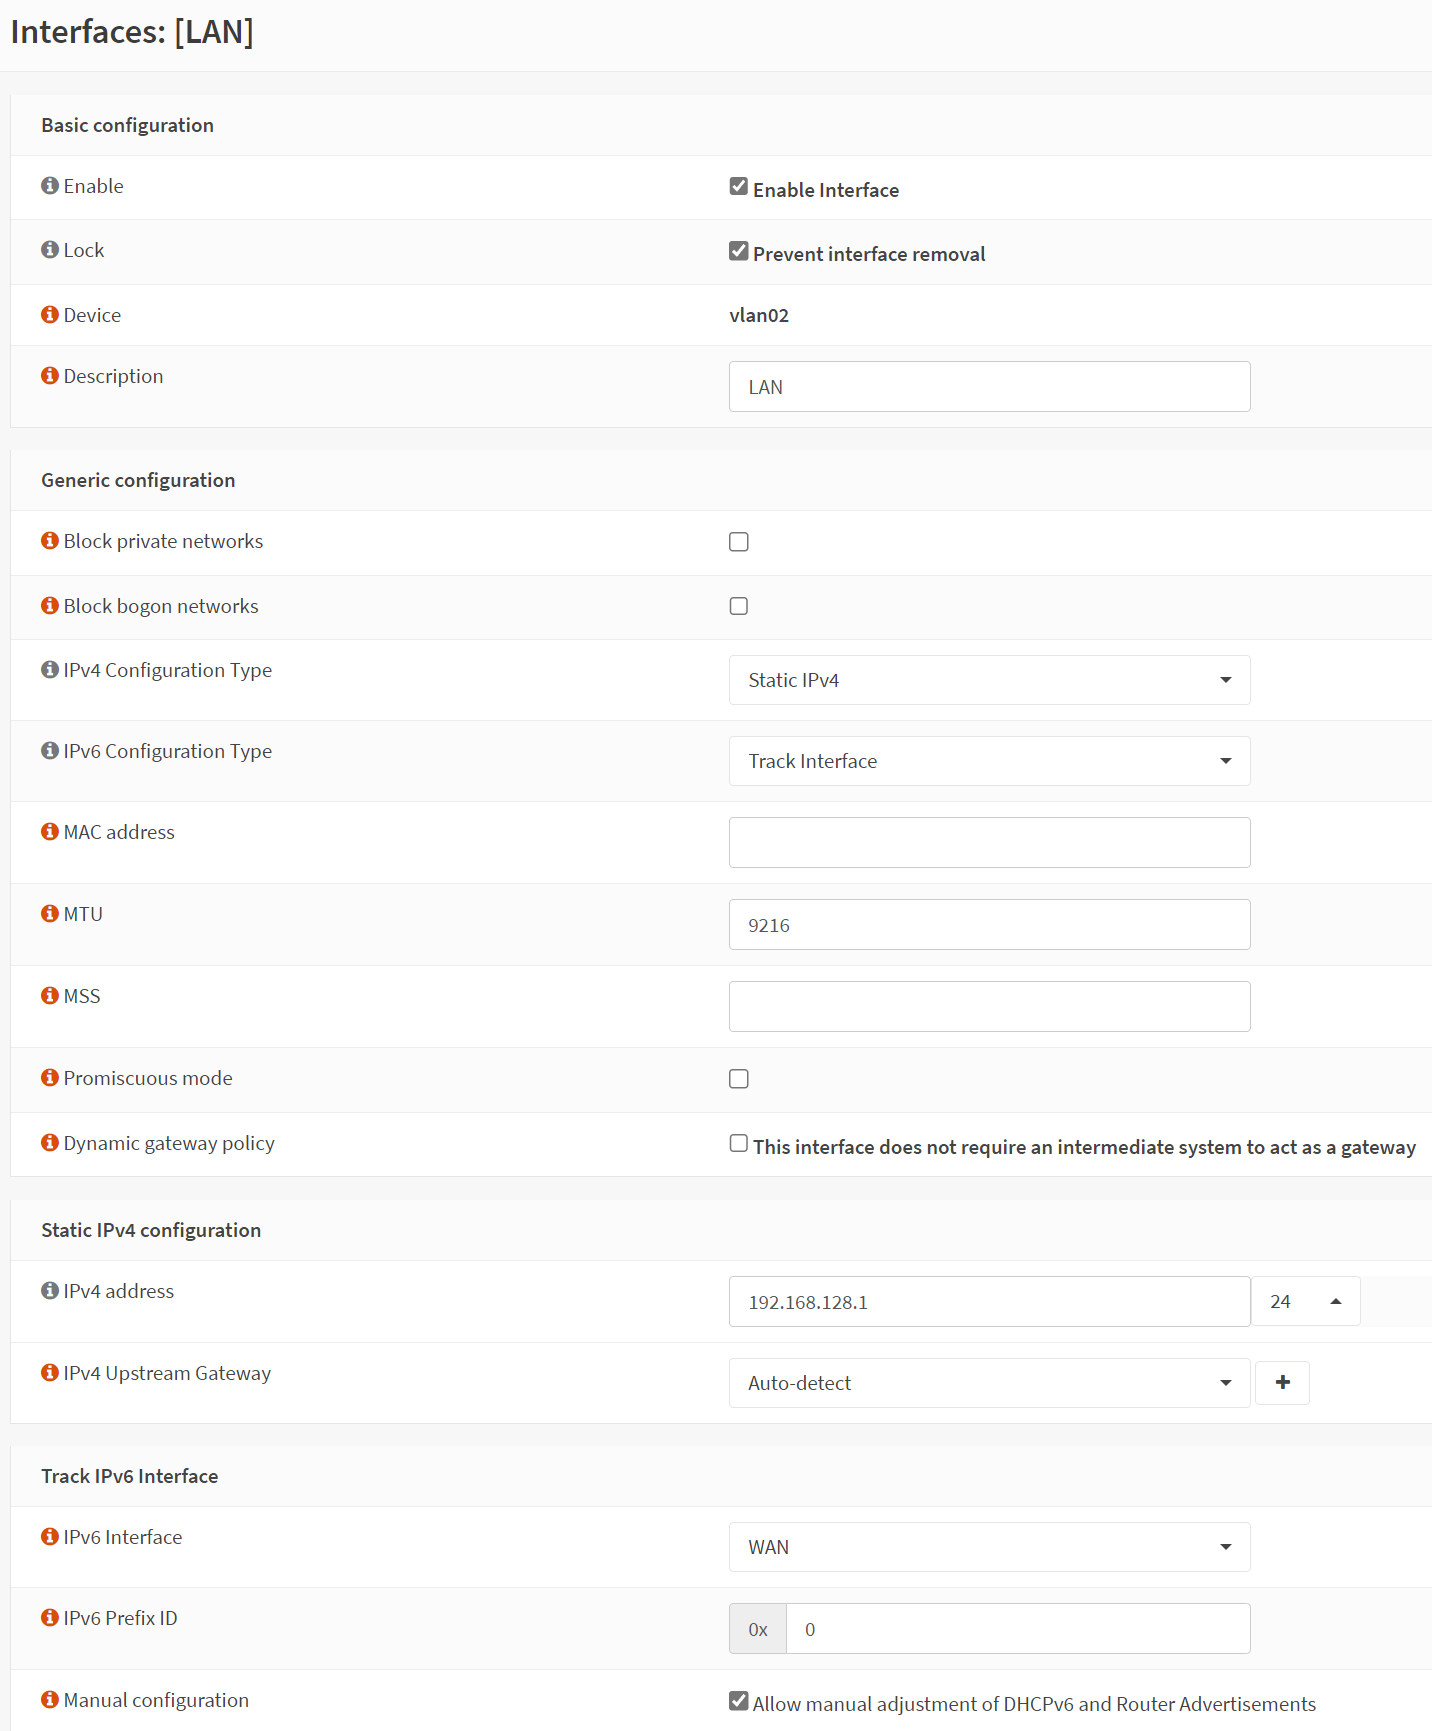
I configured my MTU, my ipv6, and my ipv4 address. Once all my VLANs were configured, I checked the Overview page, which I really don’t like the layout of, but it’s functional. My WAN interface was requesting an IPv6 prefix, and since LAN was tracking WAN for ipv6, it generated an IPv6 address for the LAN network from the prefix using SLAAC (note, you must use a /60 as your prefix delegation size for SLAAC to work). At this point, I knew I needed DHCP relay because my DHCP (and DNS) server are on the LAN vlan, but still serve the other vlans. I actually didn’t find it myself, and checked the docs. DHCP Relay is configured under DHCPv4 services Services -> DHCPv4 -> Relay. I configured the vlan interfaces to relay to my destination server. I then tested a system and got an IP! I was pretty stoked at this point and did my normal testing, a ping to 1.1.1.1 which failed. My initial assumption was that I wasn’t NATing my connections via my public IP going out, so I headed to Firewall -> NAT -> Outbound. There was actually a rule already in place for NAT (I remove this later) so outbound nat wasn’t the issue. I checked the Rules next and cross-referenced the guide and found everything is blocked by default, which is pretty normal. I made a simple rule for my LAN vlan to allow anything from the LAN Net to reach anything. Suddenly my ping worked!
The next step, which turned out to be pretty arduous, was setting up all the VLAN rules. I started with Aliases since this is how I did things in vyatta as well. The servers are all on LAN, so things in various other VLANs need access to those services, such as DNS, NTP, and in some cases MQTT. I had a misunderstanding in how OPNSense treated IN vs OUT and assumed it was the opposite of Cisco (it’s not), so I proceeded to create my NAT rules to allow other vlans in, on the LAN vlan. This worked, but only because the only rule on each other vlan was to allow that vlan access to everything 😀 oops. I fixed that and ended up with something like below.
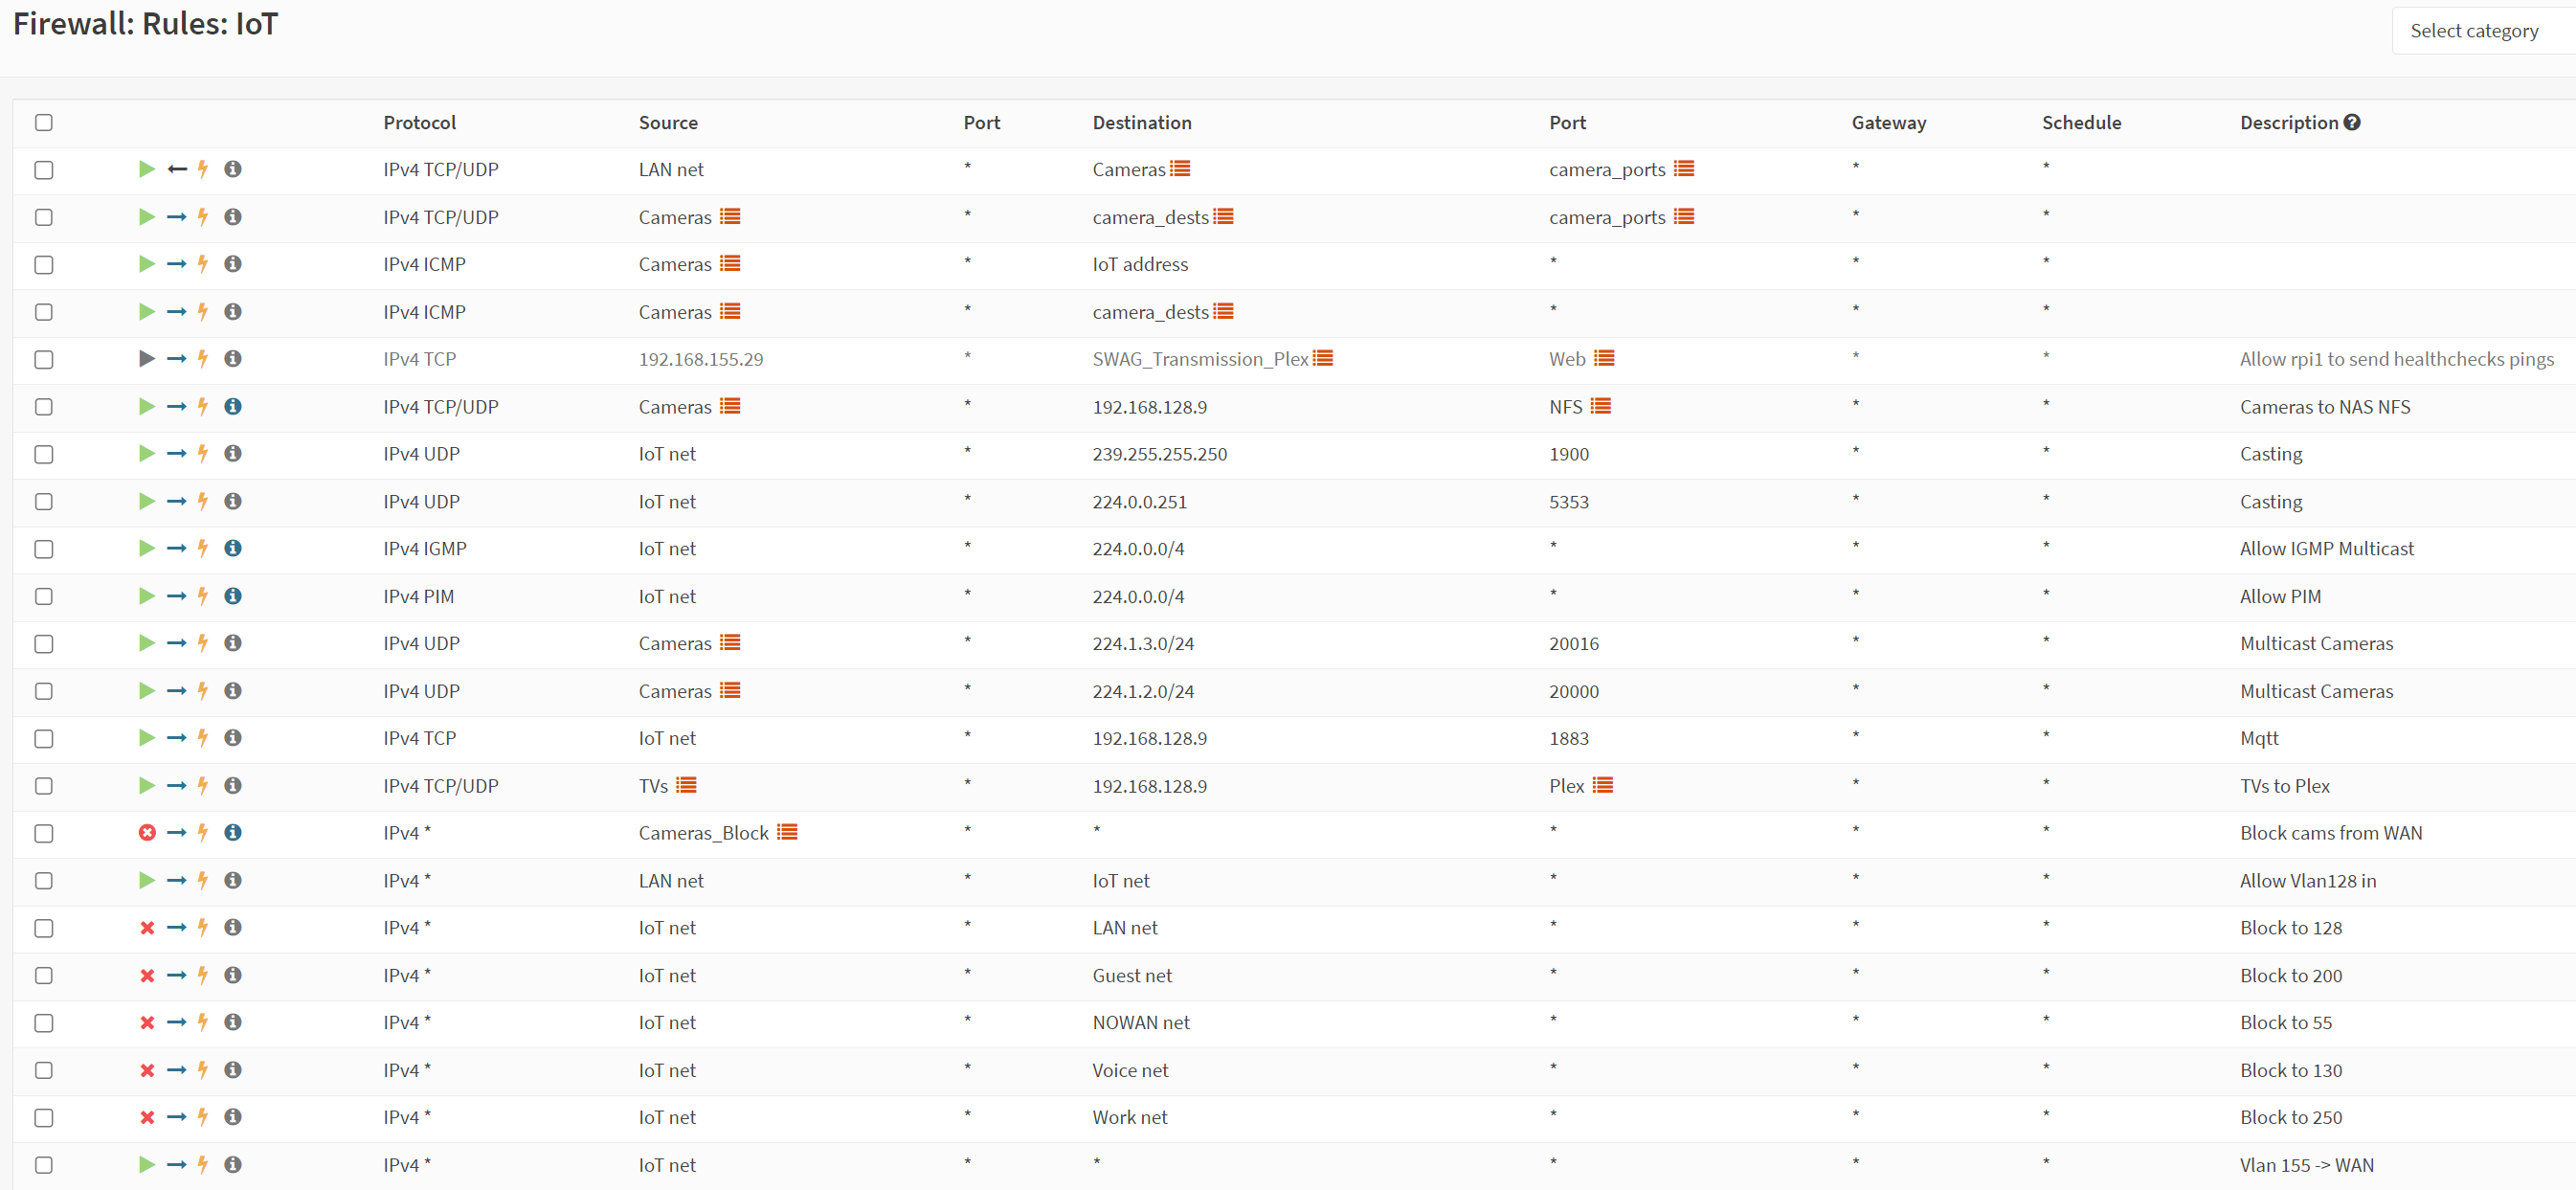
The cameras obviously belong in the NOWAN vlan, but i’ve been too lazy to configure them for the move, so instead I allowed the specific things I needed and then tossed in a block all camera stuff rule. Since rules are processed top down, you have to ensure you allow what you want before blocking (or hitting the implicit deny). At this point, I started moving myself around VLANs to verify blocks and allows were functioning as intended. I then tested chromecast, which failed, as expected. With vyatta, I used MDNS repeaters and IGMP proxy, i found these plugins existed for OPNsense, but after trying them, I couldn’t cast. I did a little research and stumbled upon UDP Broadcast Relay. I disabled MDNS repeater and IGMP Proxy and set this up, it worked perfectly, and I was able to cast from the LAN vlan to the IoT vlan. I tested with Plex, youtube, and screen mirroring.

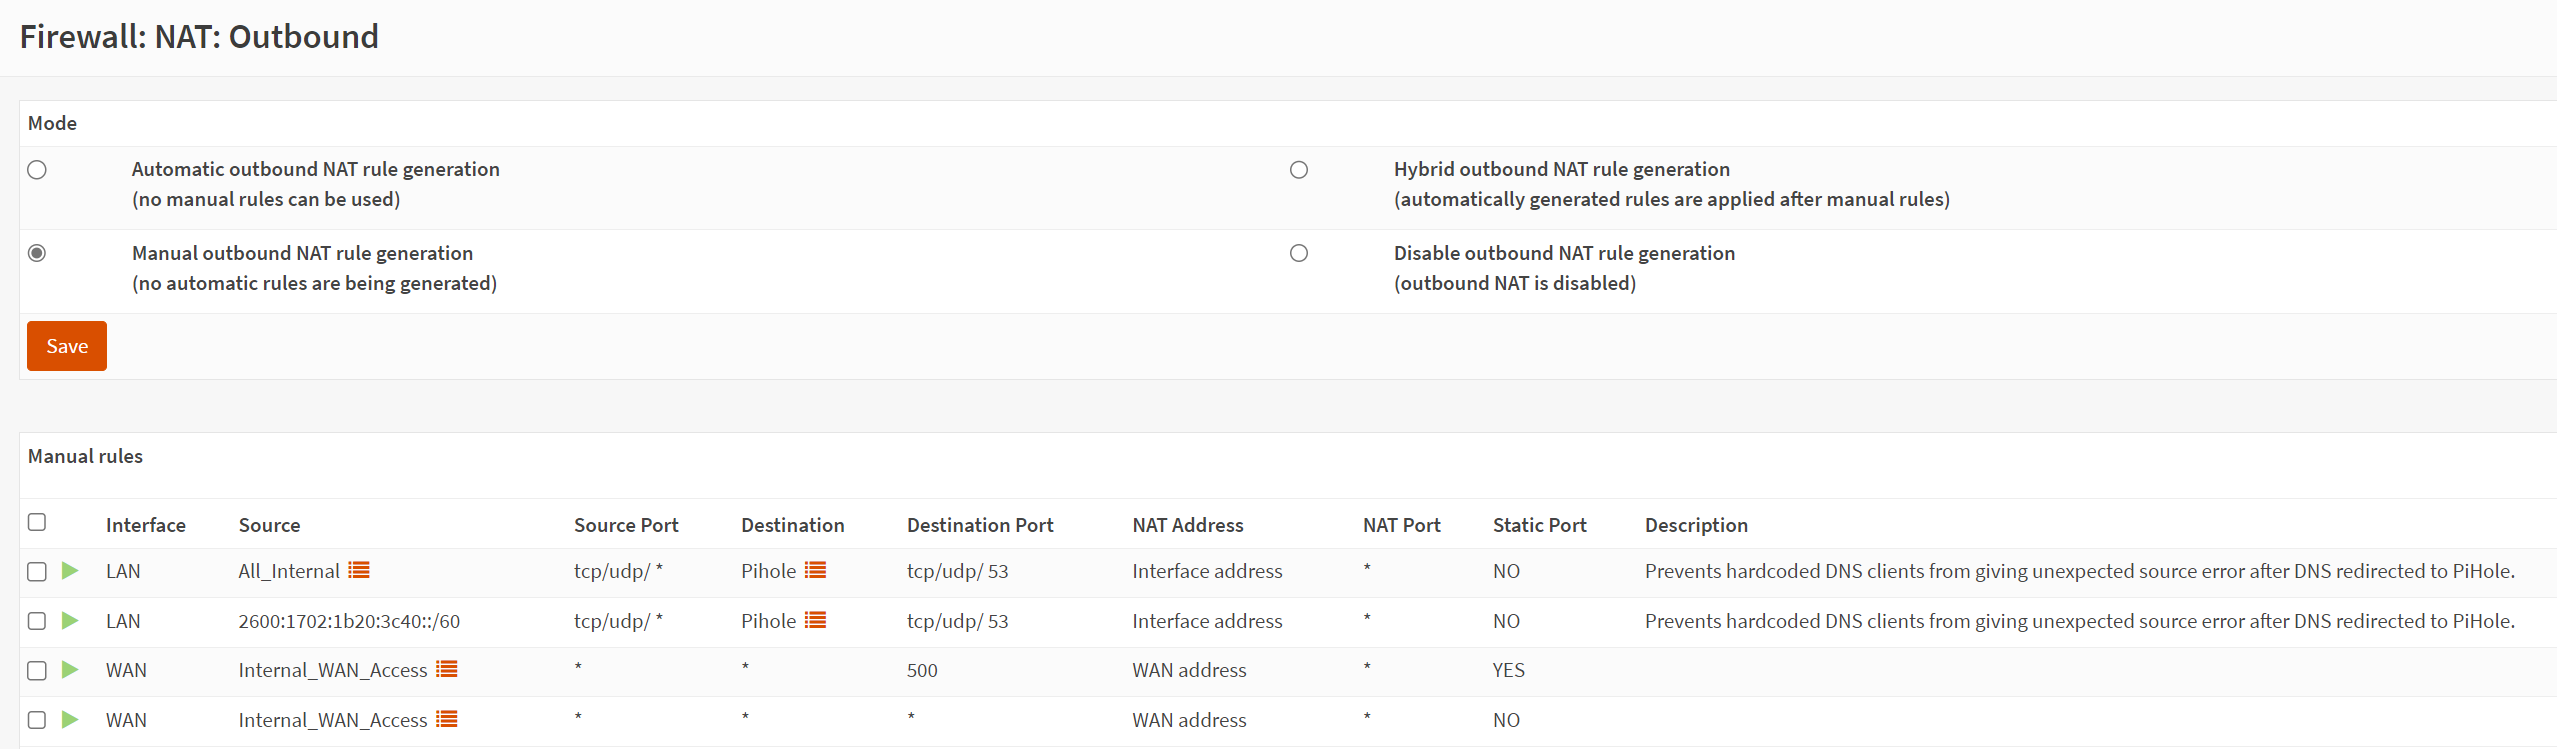
With all my rules in place, I needed to configure my port forwards for services. I also needed to ensure my rules to prevent pihole bypassing was in place. I started going through these rules and most everything worked perfectly, but I was seeing some weird behavior. I later discovered that a default setting was causing OPNsense to create corresponding rules to my DNAT entries, this caused some pretty significant DNS issues with my anti-bypass NAT. I disabled this rule auto generation as I like to be in full control anyway. Here is an example of my port forwards.
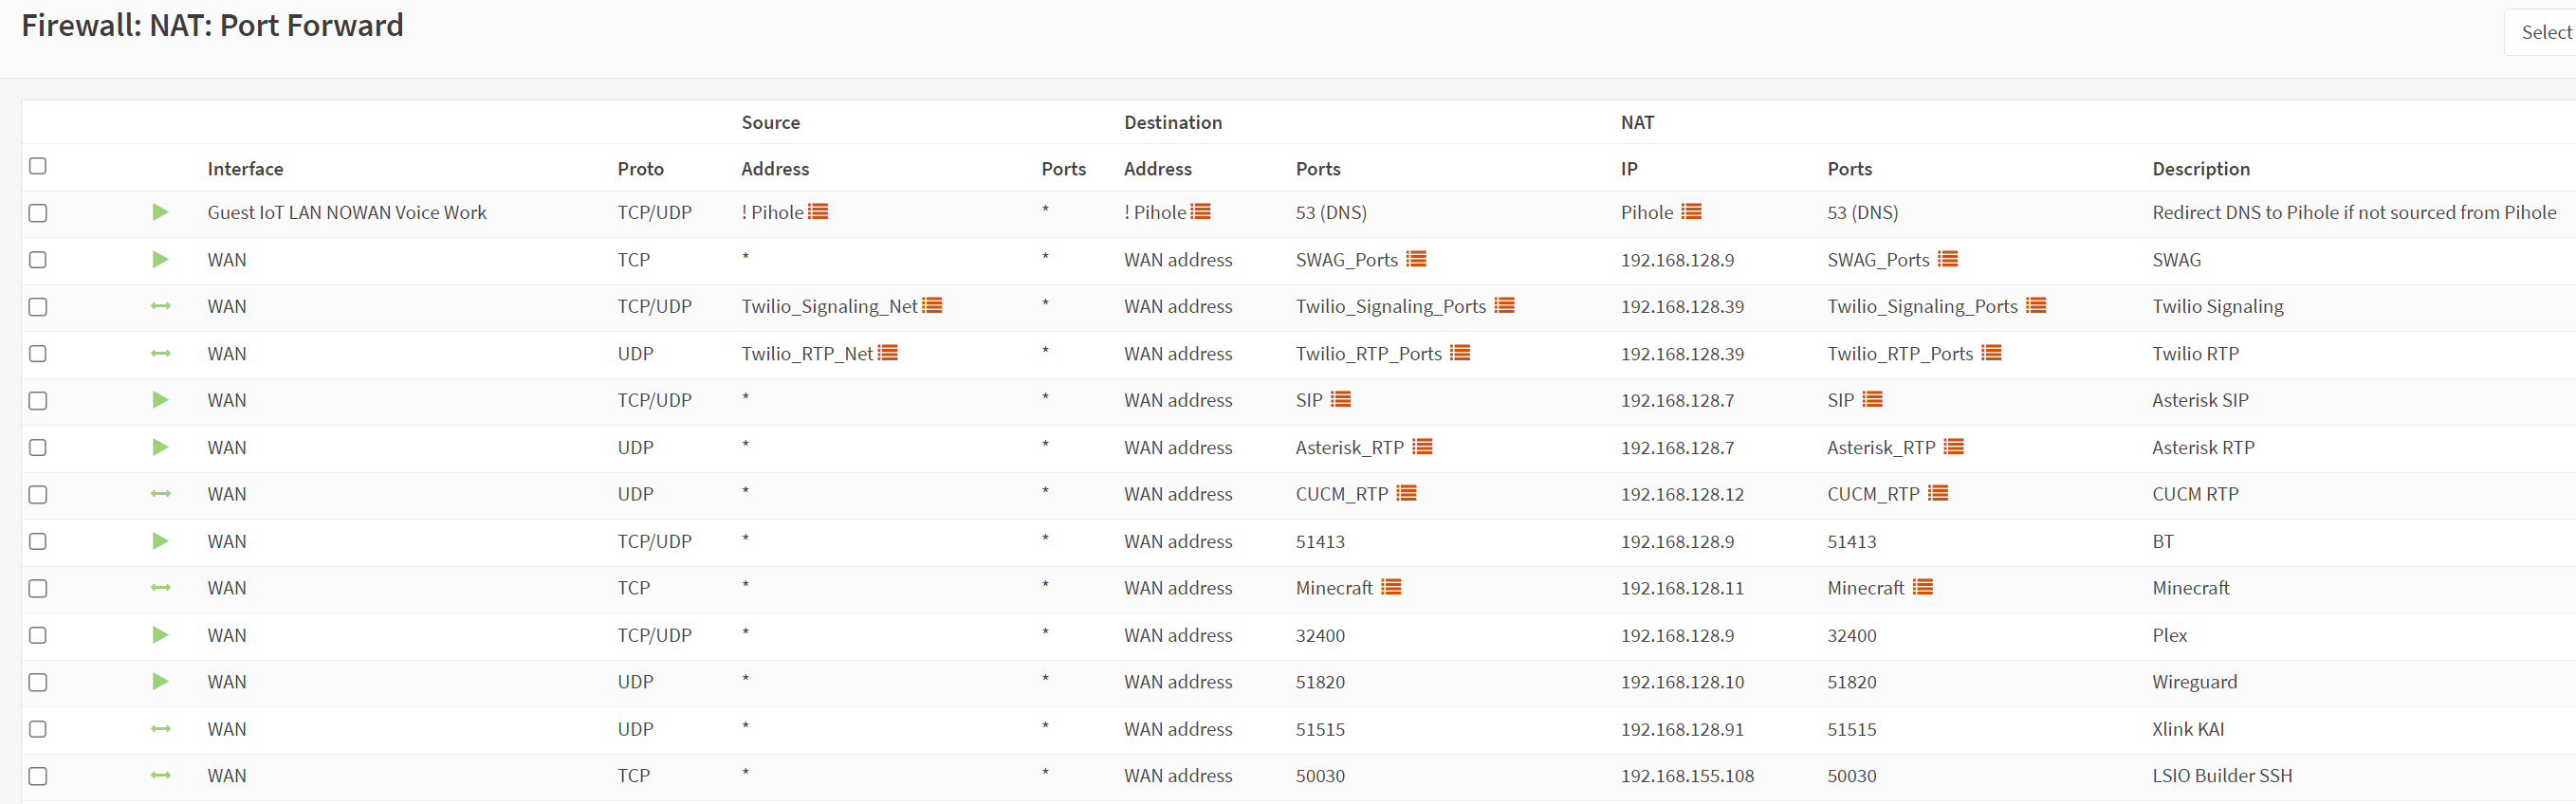
As many of you know, you can’t DNAT your stuff for pihole bypasses without SNATing too, so back to outbound NAT. The first thing I did here was replicate the automatic rules and then change to manual mode (the control thing again). Once that was done and I confirmed WAN access, i created my SNAT rule for the pihole. Unfortunately, for outbound NAT, you can’t pick IPv4+IPv6 like you can in rules, so I had to create the SNAT for ipv6 and ipv4. In the DNAT above, the alias for pihole includes the link local, public ipv6, and ipv4 addresses, so it covered it all, since you can select IPv4+IPv6. The rules are shown below.
My next step here was to do tests from the various VLANs of accessing DNS and bypassing DNS. I turned on logging for the rules and watched the live view and a debug from the pihole itself. Everything was working as intended, so I was ready to move on to site to site VPN connectivity.
If you have seen previous diagrams of my network, you know that both my parents and in-laws have site-to-site vpns to me for various services, mostly the unifi controller since I set both of their homes up as unifi homes to let them have something simple they could manage themselves. The vpn is ipsec ikev2 and while some of you are asking, well, why not wireguard, there are a couple reasons. One, I did set it up and test and there was no speed difference. It’s well known that wireguard and hw offloaded ipsec are pretty equal in speed. I also didn’t like the way you had to get wireguard onto the USG, whereas ipsec worked easily (though not from the gui itself), so for now, I decided to stick with IPSEC. I will probably change this at some point, since I’m not sure OPNSense can actually offload the ipsec connection and WG is pretty light on the CPU, but I’m not sure when. Heading to VPN -> Ipsec, i noticed the manual referenced a legacy method and a new method. I decided to try the new method. I actually couldn’t get it working at all, so I tried the legacy method and the tunnel came up pretty quickly. There is a lot of personal information on the phase1 and 2 configs, so I won’t show any screenshots, but it’s pretty straight forward from a configuration perspective. I went to VPN -> Status Overview to verify my phase1 and 2 were up and then did some normal connectivity testing.
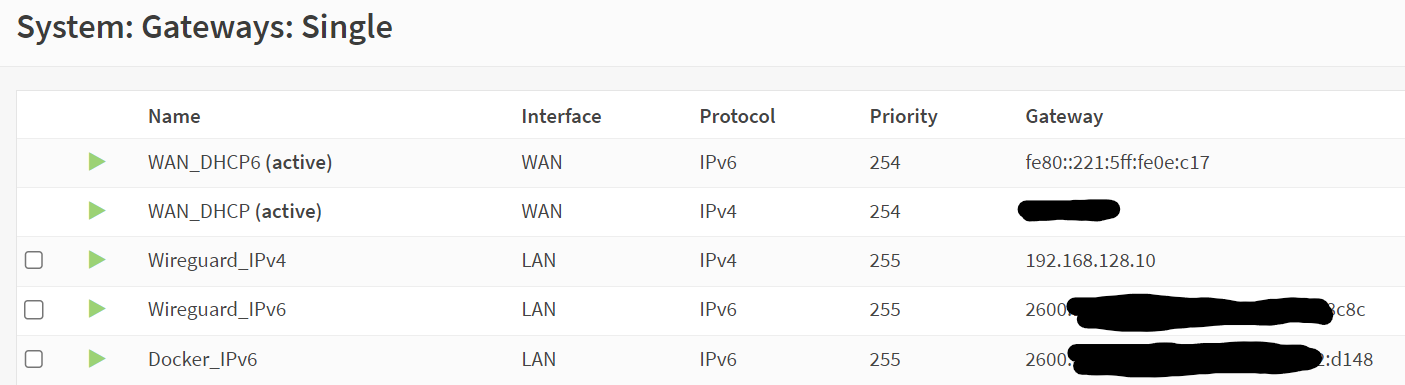
The final thing I needed to do was address some custom networks I have, specifically my IPv6 docker bridge, and my wireguard networks. To handle this, I used System -> Gateways -> single Gateway. I created a gateway for each of the static routes I would need to use which were ipv4 wireguard, ipv6 wireguard, and ipv6 docker. For the ipv6, I just carved out some /112s from my /60.
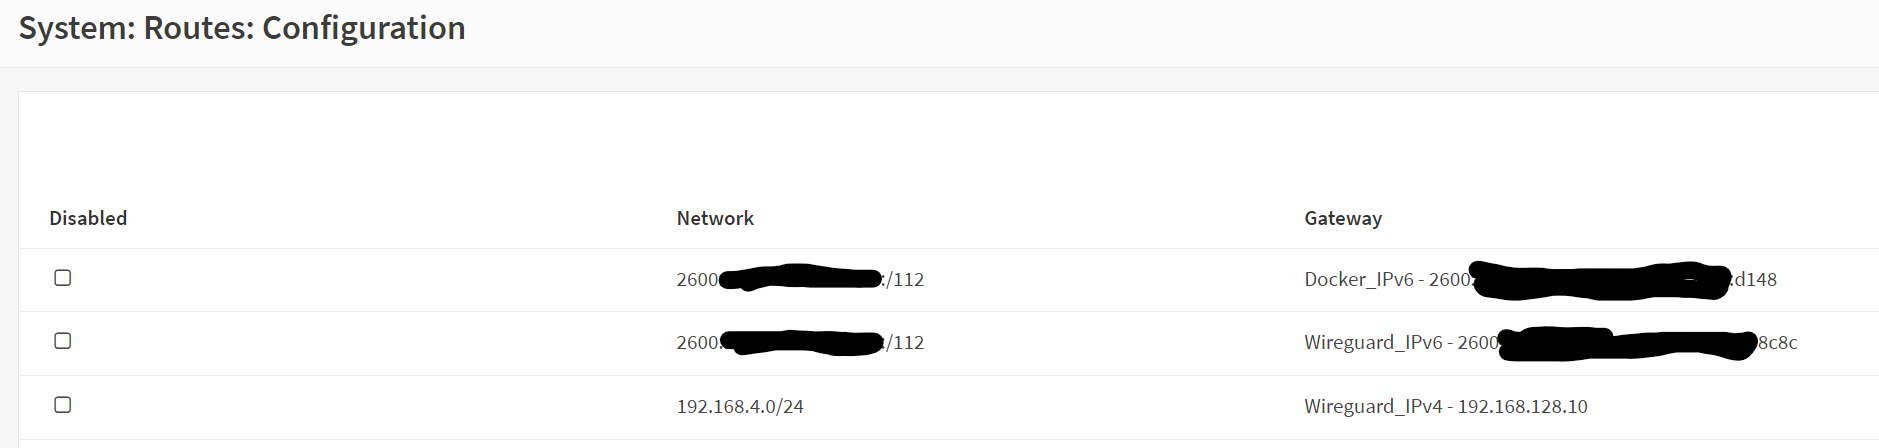
After setting up gateways, you can configure the static routes. System -> Routes -> Configuration. Once here, you can add the network address you want to route and what gateway it uses. I configured this (shown below) and tested and things were working as expected.
At this point, I was pretty happy with the setup. I did some speedtests and was getting right around 2400/2400 which is a little slower than the ATT RG, but it’s still more than I’m paying for, so I don’t care! I’ll go into some weird quirks I noticed for a bit here. Since the change, my cameras which are fed to multiple security monitors in the home via multicast have been timing out after some time and getting restarted by cron. They’ve been stable for about 4 years, so it was quite surprising. While I keep wanting to blame OPNSense because it’s the only thing that changed, I can’t justify it because that multicast traffic doesn’t leave the vlan or ever reach the router. It’s definitely odd though. As someone who hasn’t worked with 2.5G or 5G I also noticed another oddity which was that setting my SFP+ 10GBaseT module on the switch to 2.5G or 5G would make it fail (even though the router side is 2.5G, but setting it to 10G would make it work, though I would consider this a speed mismatch. Some others told me this is very typical, so I let it be. You likely saw in the diagram, the connectivity is the 10G on the azores to the 2.5G on the router, then 2.5G on the router to 10G on the switch. But, it’s all working!
Finally, I’ll discuss a couple future plans and problems I still want to do or solve. The first is access to the Azores for firmware updates. At some point after connectivity fiber, the device simply stopped listening. I’m not sure why and while I can unplug the fiber, reboot, and get access back, I’d really like to figure out permanent access as needed, without resetting/unplugging. Another thing in my notes is since the current device i’m on has 4 2.5Gbe ports, I will keep igc0 to the azores (though the azores has 2 ports) for now, igc1 to a mifi router (backup internet), then igc2 and 3 into a LAGG to my switch. I don’t imagine I’ll gain anything by this, but I’d like to see how things work more thoroughly in OPNsense. I’ve also heard some rumors that OpenWRT works better for high speeds than OPNsense (at least in this configuration, so I might take a weekend and try that out.