Well, it’s been quite some years since the original build and even the follow-up rebuild. The original build was when my oldest (turning 13) was 7 and my middle child (turning 10) was 4. They’ve had the same AMD R7 240 graphics cards since then. Unfortunately, the games they play which began as browser based games and minecraft, have upgraded to things like roblox, fortnite, and somehow minecraft’s blocks needs more juice. So here we are. Over labor day, my friend (thanks @ctark) pointed a sale at antonline out to me where they had RTX 2060’s in stock for 224$ each. First, I’ve not seen a graphics card in stock for a long time and second, while 224$ is well over what I might have planned to do for them, I thought it was worth it. Just looking at benchmarks, the new card is effectively almost 1500% better, so I decided to jump in.
As many of you may recall, the system is a linux based (debian 11) server running KVM to handle 2 of my kids’ windows 10 virtual machines. Some of you are probably thinking, well that’s a jump and a 2060 is going to need a beefier PSU. I thought the same. The PSU in the server was a 500w platinum, I had a 550w platinum in the basement so I tossed that in because I had nothing else on hand. The gpu says it requires a 500w PSU, so I thought hey.. maybe 550 will run 2 (yah yah, I will buy a bigger one soon).
So, let’s get into the meat of the action. I powered down the guests and the shut down the host. I went ahead and swapped the PSU and installed GPU1 (for now, I’ve left one r7 240 in, so I can verify things, plus I was concerned about power). The first thing I did after install was boot up and check my PCI devices.
dznet-girls ~ # lspci | grep VGA
00:02.0 VGA compatible controller: Intel Corporation HD Graphics 530 (rev 06)
01:00.0 VGA compatible controller: NVIDIA Corporation TU104 [GeForce RTX 2060] (rev a1)
04:00.0 VGA compatible controller: Advanced Micro Devices, Inc. [AMD/ATI] Oland PRO [Radeon R7 240/340] (rev 87)
We easily see the new card on 01:00.0, so now we want to grab the details, for example, the audio controller. With the old card it was simply 01:00.0 and 01:00.1, first was graphics, 2nd was the hdmi audio. To do this, we run
dznet-girls ~ # lspci -nn | grep -E '01:00.|04:00.'
01:00.0 VGA compatible controller [0300]: NVIDIA Corporation TU104 [GeForce RTX 2060] [10de:1e89] (rev a1)
01:00.1 Audio device [0403]: NVIDIA Corporation TU104 HD Audio Controller [10de:10f8] (rev a1)
01:00.2 USB controller [0c03]: NVIDIA Corporation TU104 USB 3.1 Host Controller [10de:1ad8] (rev a1)
01:00.3 Serial bus controller [0c80]: NVIDIA Corporation TU104 USB Type-C UCSI Controller [10de:1ad9] (rev a1)
04:00.0 VGA compatible controller [0300]: Advanced Micro Devices, Inc. [AMD/ATI] Oland PRO [Radeon R7 240/340] [1002:6613] (rev 87)
04:00.1 Audio device [0403]: Advanced Micro Devices, Inc. [AMD/ATI] Oland/Hainan/Cape Verde/Pitcairn HDMI Audio [Radeon HD 7000 Series] [1002:aab0]
So, surprisingly (to me), we see 4 subs on this device, the expected video and audio device, but also a USB controller and a Serial bus controller. This gives me some thoughts that I will look into later. Some of you may recall that this motherboard only has one USB controller, so I had to pass individual devices, rather than a controller, through. Perhaps I can use this USB controller which will already be passed through to each kid’s guest? I’m not sure, but I will find out 🙂 I ended up checking and while the controller is present, the port itself is not, so without soldering, I cannot leverage it 🙁
At this point, I’ve got what I need to run my first test. I edit my original script and make the following changes:
##Remove
  -device vfio-pci,host=01:00.0,bus=root.1,addr=00.0,multifunction=on,romfile=/srv/TV809MH.570 \
  -device vfio-pci,host=01:00.1,bus=pcie.0 \
##Add
  -device vfio-pci,host=01:00.0,bus=root.1,addr=00.0,multifunction=on \
  -device vfio-pci,host=01:00.1,bus=pcie.0 \
  -device vfio-pci,host=01:00.2,bus=pcie.0 \
  -device vfio-pci,host=01:00.3,bus=pcie.0 \
You’ll notice that I did not assign the romfile to my card. I’m not really sure if this is still required, but back when I originally set this up, if you were moving from seabios to ovmf for efi booting, it was definitely required. In my case, I plan to add it regardless, but I have previously read that I will need to hex edit the vbios and im not there yet, so we will test without the file. In my case, we booted right up! I checked my oldest daughter’s setup and could see the screen. I waited a bit and windows automatically installed the drivers making things look good again. I went ahead and downloaded the nvidia drivers from the site anyway and set them up, I never know if I can trust the stuff Microsoft loads in. At this point, everything looks good, so I will work on the vbios.
For the vBios, we will need our vendor and productid. We can get this by running the following command
dznet-girls ~ # lspci -knn | grep -i -A 2 01:00.0
01:00.0 VGA compatible controller [0300]: NVIDIA Corporation TU104 [GeForce RTX 2060] [10de:1e89] (rev a1)
        Subsystem: eVga.com. Corp. TU104 [GeForce RTX 2060] [3842:2068]
        Kernel driver in use: vfio-pci
We want to look at the subsystem line for the card in question. In my case, this is going to be 3842:2068. Now we can get our vBios. You can browse to techpowerup.com and input 3842:2068 in the search bar, or simply google “techpowerup 3842:2068” Once there, go ahead and verify this is your card, in my case, I see EVGA RTX 2060 6GB Bios. There is only one version so I clicked download. Next comes the modification! Now that we have the bios file, we need to edit it to allow it to properly work with qemu. In my particular case, I browsed to https://hexed.it and clicked open file, then selected the vBios. now, go ahead and ctrl+f (or click in the “search for” text box) and input 55AA. You want to find a section where your search has some characters followed by VIDEO, so you may need to continue searching. In my case, the first 55AA match is correct. In my below image, i’ve circled my actions in red along with what I was looking for. I also highlighted in yellow (yes it’s hard to see) the word VIDEO.

Now, we can go ahead and click save-as and name our file. I just added -modded to the end of my name. Now we edit our startup script again to see if everything works properly.
##Before
  -device vfio-pci,host=01:00.0,bus=root.1,addr=00.0,multifunction=on \
##After
  -device vfio-pci,host=01:00.0,bus=root.1,addr=00.0,multifunction=on,romfile=/srv/EVGA.RTX2060.rom \
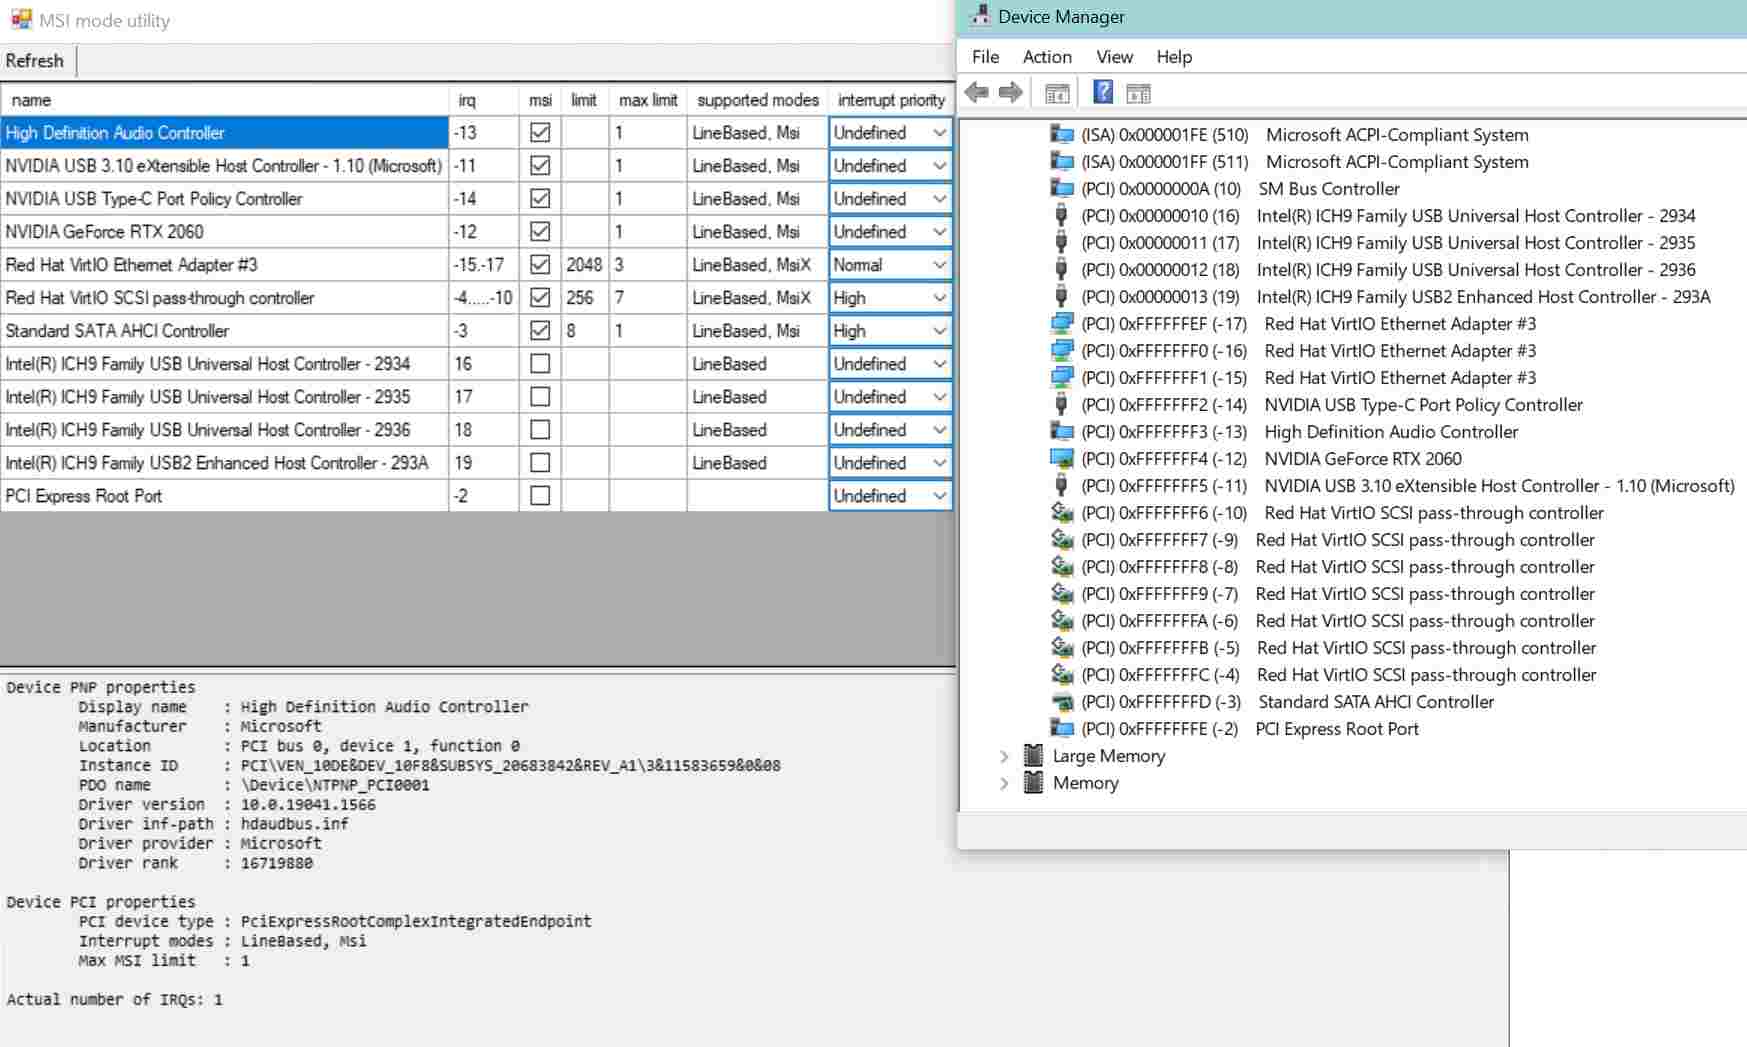
I start the machine and verify the screen turns on and everything looks good, and it does! We have the drivers installed, resolution is verified, everything looks good at this point. Now we need to verify that the new card is using MSI instead of line-based interrupts. Personally, I keep the MSI v3 )utility (1st post, towards the end you’ll see a spoiler for v2 and v3) on a network drive, so I simply run it. I see that my audio and video device are using line based interrupts. I go ahead and click these, hit apply, and then reboot. Everything comes up as expected and I run the tool again, now I have the negative numbers (image below) I was looking for and I know I’m using MSI. I did do a couple tests to verify audio was working and that games could run on higher quality graphics settings. As you can imagine, everything previously was set to the lowest possible setting and now we can likely run it all on the highest settings as the monitor is only 1080p.
As I close this entry out, I felt like I should update the WEI. Previously both VMs had a 6.8, which I thought was pretty good considering the low quality items in use. The GPU was the biggest score detractor, with this new GPU, I’m was very interested to see what the result would be. As you can see from the image below, while the graphics score drastically increased, unfortunately the sata SSD was still holding me back, though the CPU was also holding me back. Total score, instead of being an average, is just your lowest score, so with a DiskScore of 7.2, my system score is up from 6.8 to 7.2. If I had faster disks, I would still only be a 7.6 because of the CPU Sub Agg Score. This really doesn’t surprise me much though, the disks are ADATA SU800 128G SATA SSDs and the CPU is an i3-6100.
<systemscore>7.2</systemscore>
<memoryscore>8.8</memoryscore>
<cpuscore>8.8</cpuscore>
<cpusubaggscore>7.6</cpusubaggscore>
<videoencodescore>9.9</videoencodescore>
<graphicsscore>9.1</graphicsscore>
<dx9subscore>9.9</dx9subscore>
<dx10subscore>9.9</dx10subscore>
<gamingscore>9.9</gamingscore>
<diskscore>7.2</diskscore>
Hopefully this was informative. I’ll be swapping out the other GPU in the near future, but I will not blog about it. Something I found very useful (since I use EVGA cards) was this site: I was able to put in my system specs and graphics cards and get a power budget. It calculated that for 2 RTX 2060 my wattage would be 542W, so I think for now, my 550W PSU should do the trick 🙂 One way to find out!