I’ve been using the linuxserver.io secure web access gateway (SWAG) coupled with Authelia as my identity provider for quite some time. It works extremely well and I’ve been very pleased not only with the application itself, but also with the support from the authelia devs. That said, there are some features I wish authelia had that they do not yet. The biggest feature is SAML support. As many of you know, I focus heavily on Cisco Unified Communications. Cisco UC supports SAML SSO and I haven’t had anything in my lab that would let me tinker with this. Authentik can do everything authelia does plus some extras, which include SAML. I will say that I am typing this as I wing setting it up and I can already see that authentik is not as simple to configure/deploy as authelia. As a note, since I am documenting this as I do it, I will include any mistakes and how i resolve those mistakes. This is my first time touching authentik and I am purely going off the documentation available at https://goauthentik.io/docs/.
We will begin with my preparatory steps. Fortunately, I am already running postgresql and redis in my environment, both of which are requried for authentik. I use them for authelia as well, though for authelia, they are optional. My first step was to create the database, user, and grant privileges in postgres for my new authentik database.
#Generate my authentik secret key
authentik # echo "AUTHENTIK_SECRET_KEY=$(openssl rand -base64 50)" > .env
#Generate my password and add into my .env for docker-compose.yaml
authentik # openssl rand -base64 40
KuMhPUXiW9xNLm2Kc/4lSNR2s3phSo545LGavO0EczG8mwVLBSGPFA==

#Login to postgres and do my work there
authentik # psql -U postgres -h 192.168.128.9
psql (14.6 (Debian 14.6-1.pgdg110+1))
Type "help" for help.

postgres=# create database authentik;
CREATE DATABASE
postgres=# create user authentik with encrypted password '<pasted from openssl output>';
CREATE ROLE
postgres=# grant all privileges on database authentik to authentik;
GRANT
postgres=# \l
                                       List of databases
     Name      |    Owner    | Encoding |  Collate   |   Ctype    |      Access privileges
---------------+-------------+----------+------------+------------+-----------------------------

 authentik     | postgres    | UTF8     | en_US.utf8 | en_US.utf8 | =Tc/postgres               +
               |             |          |            |            | postgres=CTc/postgres      +
               |             |          |            |            | authentik=CTc/postgres
<truncated for length/relevance>

#Configure mail settings
authentik # cat >> .env << EOF
# SMTP Host Emails are sent to
AUTHENTIK_EMAIL__HOST=smtp.gmail.com
AUTHENTIK_EMAIL__PORT=587

AUTHENTIK_EMAIL__USERNAME=[email protected]
AUTHENTIK_EMAIL__PASSWORD=<removed>
# Use StartTLS
AUTHENTIK_EMAIL__USE_TLS=true
AUTHENTIK_EMAIL__TIMEOUT=10
# Email address authentik will send from, should have a correct @domain
AUTHENTIK_EMAIL__FROM=[email protected]
EOF
With this preparation out of the way, I am setting up my compose. Authentik provides a pretty nice compose snippet you can use, but I keep all of my containers in a single compose file and follow a certain structure. I will show my added snippet below. Note my ports for the server portion, 9000, 9001, and 9443 were already in use. I also added a conditional depends_on section because I wanted to ensure both postgresql and redis are ready to accept connections before Authentik starts up.
  authentik-server:
    image: ghcr.io/goauthentik/server
    container_name: authentik_server
    networks:
      - dznet
    depends_on:
      pgsql:
        condition: service_healthy
      redis:
        condition: service_started
    command: server
    environment:
      AUTHENTIK_REDIS__HOST: redis
      AUTHENTIK_POSTGRESQL__HOST: postgres
      AUTHENTIK_POSTGRESQL__USER: authentik
      AUTHENTIK_POSTGRESQL__NAME: authentik
      AUTHENTIK_POSTGRESQL__PASSWORD: ${PG_PASS}
    volumes:
      - ${CONFDIR}/authentik/media:/media
      - ${CONFDIR}/authentik/custom-templates:/templates
    env_file:
      - ${CONFDIR}/authentik/.env
    ports:
      - 9002:9000
      - 9444:9443
    labels:
      - duin.enable=true
    restart: unless-stopped
  authentik-worker:
    image: ghcr.io/goauthentik/server
    container_name: authentik_worker
    networks:
      - dznet
    depends_on:
      pgsql:
        condition: service_healthy
      redis:
        condition: service_started
    command: worker
    environment:
      AUTHENTIK_REDIS__HOST: redis
      AUTHENTIK_POSTGRESQL__HOST: postgres
      AUTHENTIK_POSTGRESQL__USER: authentik
      AUTHENTIK_POSTGRESQL__NAME: authentik
      AUTHENTIK_POSTGRESQL__PASSWORD: ${PG_PASS}
    user: ${PUID}:${PGID}
    volumes:
      - /var/run/docker.sock:/var/run/docker.sock:ro
      - ${CONFDIR}/authentik/media:/media
      - ${CONFDIR}/authentik/custom-templates:/templates
      - ${CONFDIR}/authentik/certs:/certs
   env_file:
      - ${CONFDIR}/authentik/.env
    labels:
      - duin.enable=true
    restart: unless-stopped
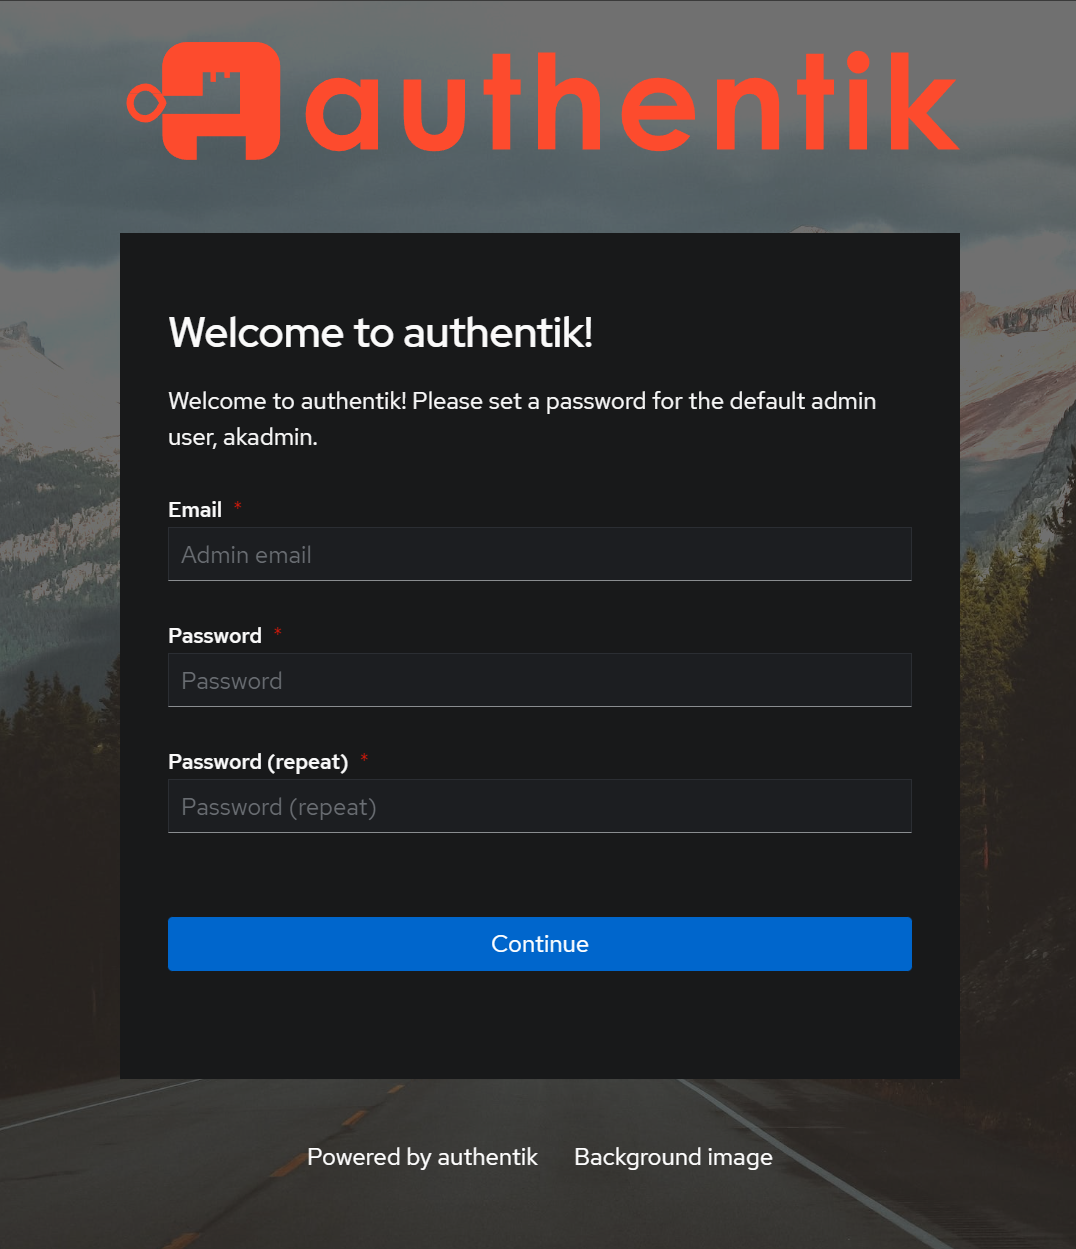
After modifying my docker-compose.yaml, I did a pull and up -d. I then monitored the logs. I had planned to share the logs, but it’s an absolute ton of data in the logs, so I will skip that 🙂 With things started up, I am directed to visit https://<your server>/if/flow/initial-setup/, which in my case will be https://192.168.128.9:9444/if/flow/initial-setup. I already knew there was a gui, which many know I’m not a huge fan of, but I’ve heard you can configure purely from the CLI as well. For this blog post, however, I will strictly follow the documentation. Browsing to the site, I get the expected “Your connection isn’t private” warning, obviously, since I have no certs for authentik yet. I am tentatively planning to leverage the certs from SWAG. I am presented with this login screen, which presumably indicates things are good up to this point!
Following my normal practice, I generate a password from bitwarden and proceed. I am presented with a screen as below. Noting my face in the top right, I can tell that this links to gravatar based on the input email address.

A fortunate thing I skipped during setup was the TZ environment variable and mounting /etc/localtime which are pretty standard for me to do at this point. Luckily, I forgot to do it this time as I just saw this warning in the docs.
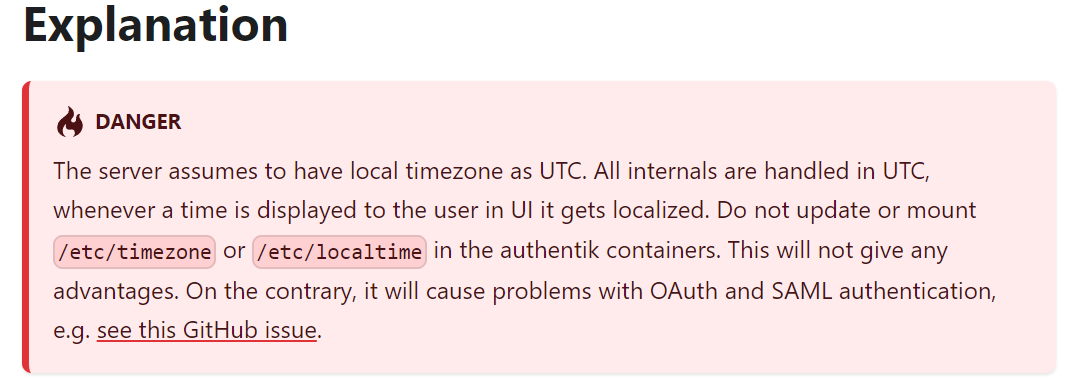
Since I plan to use SAML for sure and likely play with OAuth, I’m glad I forgot to input those into my compose. I’ve now completed the “docker-compose installation” section and have a running instance I can login to. I moved to the “Configuration” section of the guide. The first steps here are to dump some data and verify settings using the following command docker-compose run --rm worker dump_config which I adjusted to docker compose run --rm authentik-worker dump_config. I got a lot of data output which I’m running through now to confirm various settings, per the guide. I noticed in the “Listen Setting” section that I did not have the LDAP, prometheus, or Go Debugging lines. I suspect some future configuration may result in the addition of those, for now I will note and move on. There are things here I would like to modify or add, but as I’ve not seen how to properly do this yet, I will leave them be. With this, the “Configuration” section was completed and I will move into the “Reverse Proxy” section.
As stated above, my reverse proxy is Linuxserver.io’s Secure Web Access Gateway (SWAG), so I will be using this. For my integration, I copied the authelia-server.conf.sample and authelia-location.conf.sample. I then used sed to change authelia to authentik and changed a coupled things like the proxy_pass line, port, etc. I restarted swag and had no errors. At this point, the docs kind of left me in the dark as to how to proceed, so I decided to try to tackle some things, such as certs. The compose snippet mapped a random certs directory into /certs. I will, instead, map the swag certs directory into /certs. I changed the /certs volume to be ${CONFDIR}/swag/etc/letsencrypt:/certs. Since there’s a web ui, i went ahead and created a proxy-conf for it. I just used the template. I assume there’s an API so i have an /API location in the proxy-conf.
At this point, I have a working reverse proxy config to reach the web ui and I’m exploring the webui. I did things like changing the default username, enrolling MFA devices, and checking out connected services for the admin account. Unfortunately, when I tried to add my yubi key, everything was going fine, I got prompted to touch the key, then I got the error shown below, so I will return to this later.

Since I’m a bit lost, I started just reading through the docs. My goal was to find something I could do (note that I havent just picked a proxy-conf and enabled my authentik configs like I would for authenlia. This would perhaps just work, but I want to have authentik setup in a way I like first. I won’t go into detail on setting up duo from the duo perspective, but once I stumbled across the Stages__Duo authenticator setup page, I decided to work on this. After creating my application in the duo dashboard, I went to admin settings -> flows & stages -> stages. From here, I clicked new stage and selected “Duo Authenticator Setup Stage.” I input the data from the duo dashboard and clicked finish. Unfortunately (I find I’m typing that word pretty regularly…) I got an error from CSRF shown below. I recall from the dump earlier that my domain was null in the COOKIE_DOMAIN setting and I have a suspicion that this is the cause.

As always, I’ll come back to this later. Exploring the settings, I found system -> tenants. I decided to hit update tenants and see what options were there. I didn’t see much to play with, but at the bottom was a web certificate section where I could select my mapped in cert from swag, so I did so. As expected, I got a csrf error, same as above. I still haven’t resolved the COOKIE_DOMAIN setting yet or found how to. In light of this, I went back to the reverse proxy section in the docs and made some modifications. I added the map section they have into nginx.conf in swag, i overrode a couple items from the includes section in my proxy-conf, and I restarted swag. After doing this the CSRF error went away, below is the proxy-conf I settled on for now. As a note, the COOKIE_DOMAIN appears to have not been the issue as even after the proxy changes, it still shows NULL, but I did find earlier in the tenants section that I could set a domain, the default was “authentik-default” so I decided to change this to my domain, this still had no effect on the COOKIE_DOMAIN though. The second code block shows the existing websocket section in the SWAG nginx.conf and below that is what I added for authentik.
## Version 2023/02/01
# make sure that your dns has a cname set for authentik and that your authentik container is not using a base url

server {
    listen 443 ssl http2;
    listen [::]:443 ssl http2;
    server_name authentik.*;

    include /config/nginx/ssl.conf;
    client_max_body_size 0;
    location / {
        include /config/nginx/resolver.conf;
        proxy_http_version 1.1;
        proxy_set_header X-Forwarded-Proto $scheme;
        proxy_set_header X-Forwarded-For $proxy_add_x_forwarded_for;
        proxy_set_header Host $host;
        proxy_set_header Upgrade $http_upgrade;
        proxy_set_header Connection $connection_upgrade_keepalive;
        set $upstream_app authentik-server;
        set $upstream_port 9443;
        set $upstream_proto https;
        proxy_pass $upstream_proto://$upstream_app:$upstream_port;
    }
}
    # Helper variable for proxying websockets.
    map $http_upgrade $connection_upgrade {
        default upgrade;
        '' close;
    }
    # Helper variable for authentik.
    map $http_upgrade $connection_upgrade_keepalive {
        default upgrade;
        ''      '';
    }
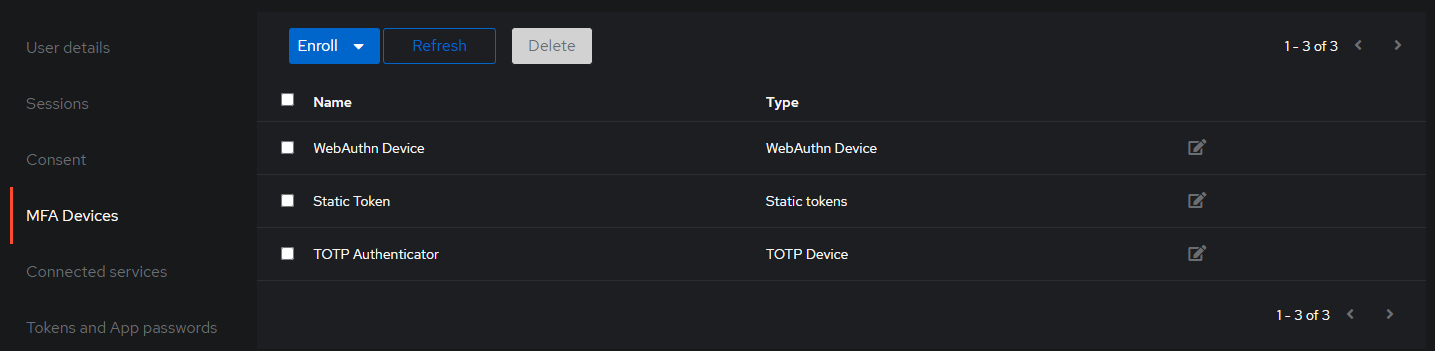
I went back and added my DUO authenticator stage successfully. At the bottom is a section that reads “Configuration Flow” and indicates if this is empty, users can’t configure this stage. I didn’t really know what to do here, so I set it to “default-authenticator-totp-setup.” for now. Next, I decided to setup a new source for logging in, Directory -> Federation & Social login. In my case, I selected LDAP source to use my existing active directory server, though the list is quite expansive. I input my data and it was added successfully. I decided to go back to my user settings and try to enroll my webauthn device (a yubikey), this time it worked without an issue. I logged out and logged back in, after inputting my password, I was prompted to touch my key. I then decided to add a TOTP authenticator as a backup (I’ll add duo later as well), I scanned the QR code, input the generated totp and it added. Once again logging out and back in, this time I was prompted to choose between the totp or the webauthn device, selecting totp, i input the generated code and successfully logged in. As always with totp, it’s best to do backups, so I also added static authenticator to get some 2fa recovery keys I can put in the safe.
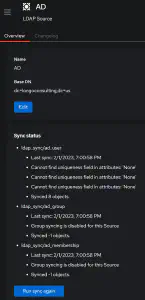
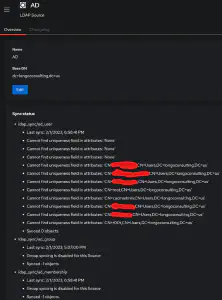
In authelia, I log in based on my local active directory instance and then have multiple options for MFA. I wanted to get all that setup. Fortunately, we can test this by logging into the web ui rather than having to wait until we proxy applications. An important thing to do post LDAP configuration is to check syncing. If you click the source you created under Directory -> Federation… you’ll get an overview. Unfortunately in my case, I had some errors to resolve. Under additional settings for the source, there is a section titled “Object Uniqueness field.” I had set this to upn because it’s a unique field in AD, but this didn’t seem to be liked by authentik. “objectSid” is the default, so I put it back to this to test. As soon as I hit update, it synced 8 objects, though it still complained about some “None” items.
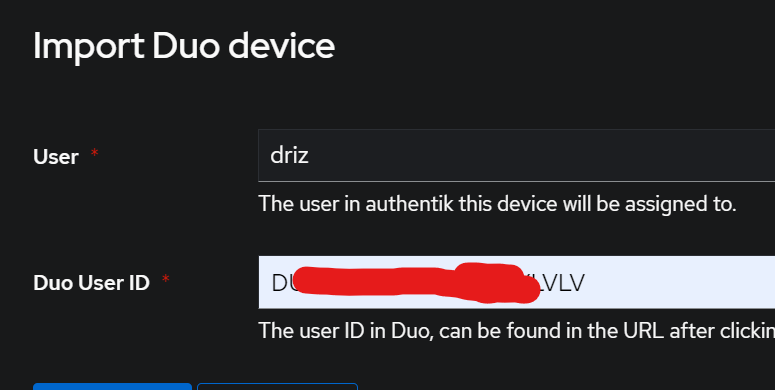
Previously I configured the duo setup, but it seemed to work differently from authelia in that without a paid account, I need to link it to a user. I cheated a little here and googled a bit and found a solution on discord. You login to duo, go to users, click the user, and copy the id. Now, you go to Flows & Stages-> Stages. In the row with the DUO setup stage created earlier, there’s a second button in the actions column, it’s for importing. Click that, select the user, and paste in the duo id. Repeat for the rest of your duo users.
Now I logged out, and logged back in, this time using my AD credentials. I selected duo, got an alert on my phone, hit allow, and got logged in. I logged out, logged in using my AD credentials, selected webauthn, tapped my token, logged in. Everything seemed good!
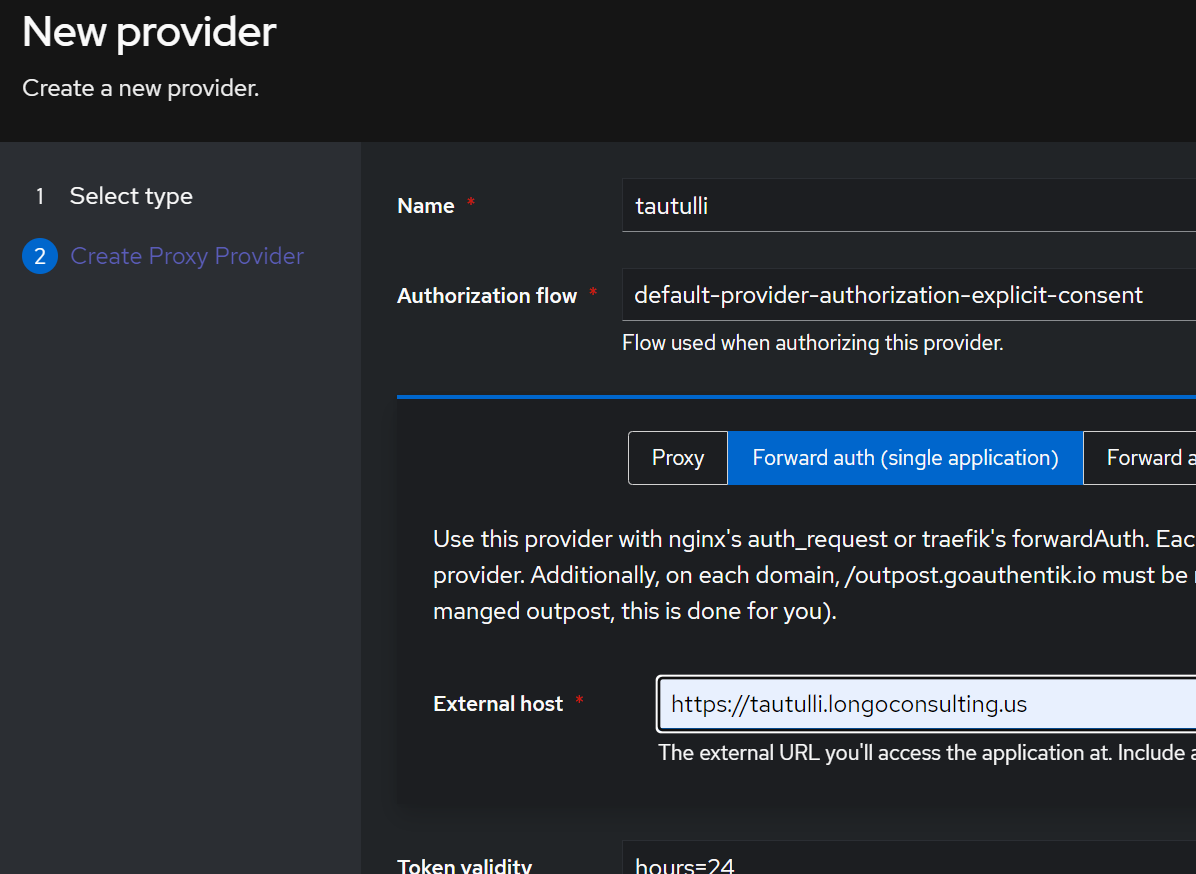
At this point, I suppose it’s time to try and reverse proxy an application. Applications -> Providers. Here we have a bunch of options and honestly, I think the documentation is a bit lacking, but for this test, I think Proxy provider is what I will use since I’m relying on SWAG to reverse proxy most of my stuff. Once in here, there are a lot of options, in my case, I went with explicit consent and forward auth (single application). While I think domain level sounds the closest to what I have with Authelia, the documentation is more in depth on single apps. I will play with domain level later.
I noticed a few things of interest in authentik which may allow it to proxy some dumb apps. In general, my thought process is something like, if an app is exposed to the WAN it must have MFA, so apps with MFA natively are just directly exposed. Apps with login/pass only are behind authelia. The preference for those would be to disable authentication on the app itself and purely rely on authelia. However, I had a couple apps which didn’t support having no authentication, but could use basic authentication. The provider setup in authentik has a section where you can fill in that basic authentication info. I obviously haven’t tested this, but I suspect we can put a common username/password for the basic auth, input that data into a single app provider, and then authentik will handle authentication as a whole with MFA and whatever else you configure. I’ll have to test this later. I went ahead and created a single app provider for a couple more apps as well, for testing.
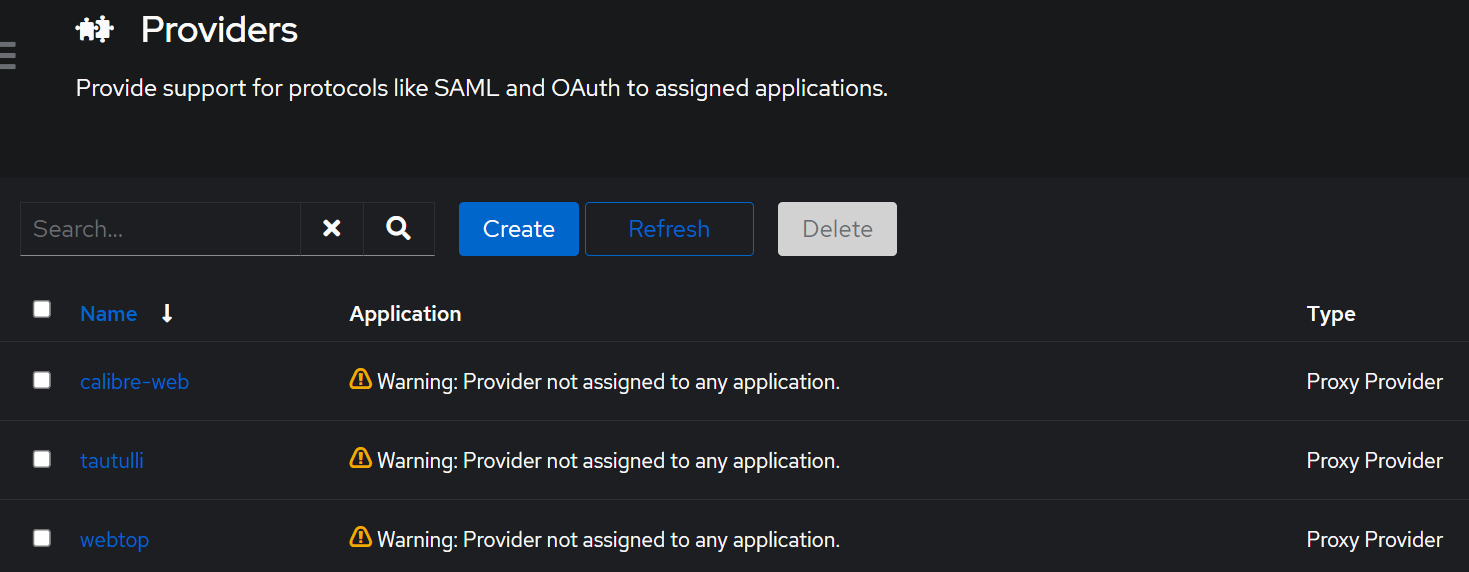
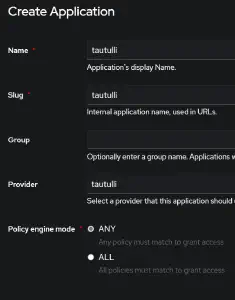
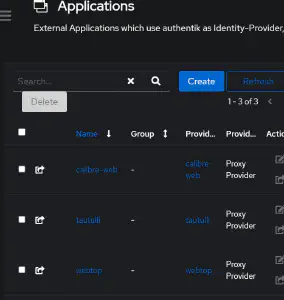
As you can see in the screenshot above, there is a warning that I did not assign this provider to any application. I also haven’t created any applications, so I’ll check that next. Applications -> Applications. In this section, I have was pretty confused on what to do, so as usual, I just winged it.
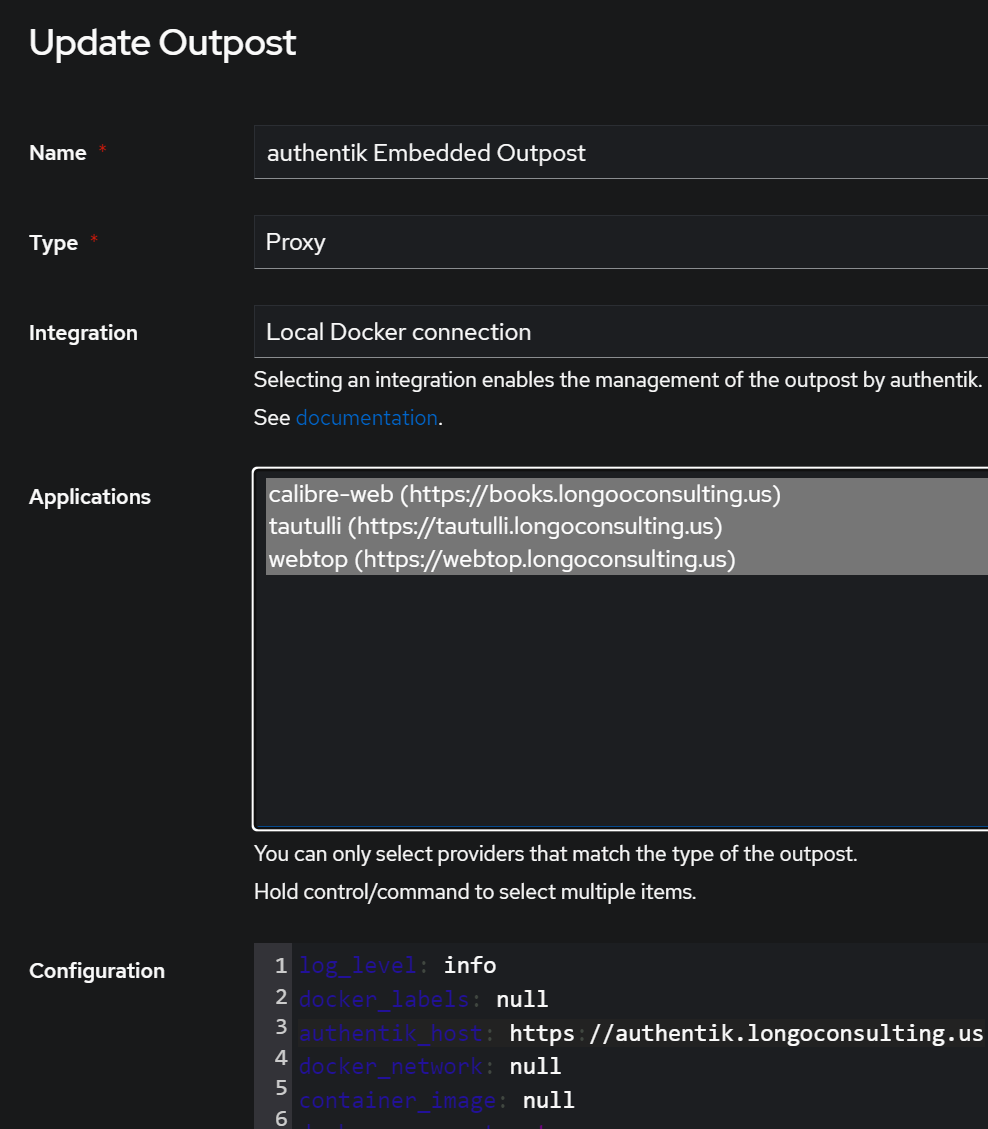
Next we need to link our applications to the “outposts” Applications -> Outposts. I hit the actions button for the embedded outpost to edit. I selected all my applications and noticed line 3 in the configuration section was a bit jank, so i figured, let’s change it to the fqdn. Fortunately, after reviewing the outposts documentation section, it looks like we wanted to do this anyway!
After completing these steps, I’ll create my authentik-location.conf and authentik-server.conf. My basis for these is based on the forward auth section of the docs. The first file is authentik-server.conf and the second is authentik-location.conf
## Version 2023/02/01
# Make sure that your authentik container is in the same user defined bridge network and is named authentik-server

    # all requests to /outpost.goauthentik.io must be accessible without authentication
    location /outpost.goauthentik.io {
        proxy_pass              http://authentik-server:9000/outpost.goauthentik.io;
        # ensure the host of this vserver matches your external URL you've configured
        # in authentik
        proxy_set_header        Host $host;
        proxy_set_header        X-Original-URL $scheme://$http_host$request_uri;
        add_header              Set-Cookie $auth_cookie;
        auth_request_set        $auth_cookie $upstream_http_set_cookie;
        proxy_pass_request_body off;
        proxy_set_header        Content-Length "";
    }

	# Special location for when the /auth endpoint returns a 401,
    # redirect to the /start URL which initiates SSO
    location @goauthentik_proxy_signin {
        internal;
        add_header Set-Cookie $auth_cookie;
        return 302 /outpost.goauthentik.io/start?rd=$request_uri;
        # For domain level, use the below error_page to redirect to your authentik server with the full redirect path
        # return 302 https://authentik.company/outpost.goauthentik.io/start?rd=$scheme://$http_host$request_uri;
    }
## Version 2023/02/01
# Make sure that your authentik server container is in the same user defined bridge network and is named authentik-server

        ##############################
        # authentik-specific config
        ##############################
        auth_request     /outpost.goauthentik.io/auth/nginx;
        error_page       401 = @goauthentik_proxy_signin;
        auth_request_set $auth_cookie $upstream_http_set_cookie;
        add_header       Set-Cookie $auth_cookie;

        # translate headers from the outposts back to the actual upstream
        auth_request_set $authentik_username $upstream_http_x_authentik_username;
        auth_request_set $authentik_groups $upstream_http_x_authentik_groups;
        auth_request_set $authentik_email $upstream_http_x_authentik_email;
        auth_request_set $authentik_name $upstream_http_x_authentik_name;
        auth_request_set $authentik_uid $upstream_http_x_authentik_uid;

        proxy_set_header X-authentik-username $authentik_username;
        proxy_set_header X-authentik-groups $authentik_groups;
        proxy_set_header X-authentik-email $authentik_email;
        proxy_set_header X-authentik-name $authentik_name;
        proxy_set_header X-authentik-uid $authentik_uid;
To make use of these, I did slight modifications to the proxy-confs, keeping it in such a way that it will fit in with our design for an easy PR later. For the sake of space, I will show just one as they’re all relatively similar.
## Version 2022/09/08
# make sure that you have a cname set for the webtop
# set up authentication here, for better security

server {
    listen 443 ssl;
    listen [::]:443 ssl;

    server_name webtop.*;

    include /config/nginx/ssl.conf;

    client_max_body_size 0;

    # enable for ldap auth (requires ldap-location.conf in the location block)
    #include /config/nginx/ldap-server.conf;

    # enable for Authelia (requires authelia-location.conf in the location block)
    #include /config/nginx/authelia-server.conf;

    # enable for Authentik (requires authentik-location.conf in the location block)
    include /config/nginx/authentik-server.conf;

    location / {
        # enable the next two lines for http auth
        #auth_basic "Restricted";
        #auth_basic_user_file /config/nginx/.htpasswd;

        # enable for ldap auth (requires ldap-server.conf in the server block)
        #include /config/nginx/ldap-location.conf;

        # enable for Authelia (requires authelia-server.conf in the server block)
        #include /config/nginx/authelia-location.conf;
	# enable for Authentik (requires authentik-server.conf in the server block)
        include /config/nginx/authentik-location.conf;

        include /config/nginx/proxy.conf;
        include /config/nginx/resolver.conf;
        set $upstream_app webtop;
        set $upstream_port 3000;
        set $upstream_proto http;
        proxy_pass $upstream_proto://$upstream_app:$upstream_port;

        proxy_buffering off;
    }
}
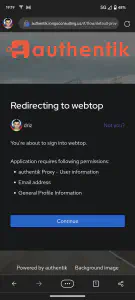
You can easily see that the added portions are in line with the authelia sections. Once I modified the 3 configs, I restarted SWAG and made an internal connection attempt. I opened tautulli in an incognito window and I was welcomed to authentik. I logged in using AD credentials and my webauthn token and was presented with a redirecting banner. It informed me of what permissions were required to complete this action (See below)
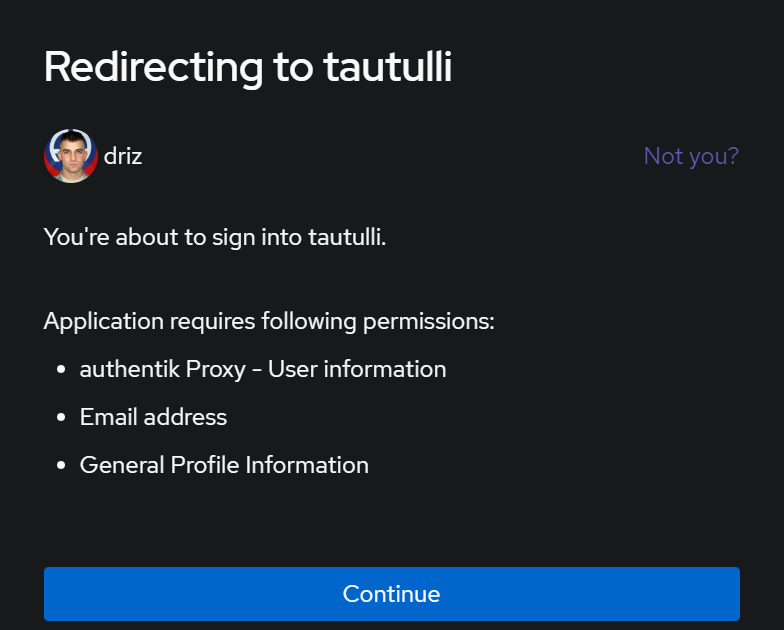
I clicked continue and was presented with the tautulli application. Following this, I need to test externally on webtop, so since we’re using subdomain to reach authentik, I will create a cname for authentik at cloudflare (my DNS provider). I got impatient and kept trying to login but it failed because the DNS wasn’t propagated yet, but finally, I’m prompted! I input my AD credentials and picked DUO because I have no idea where my NFC yubikey is. I was prompted to accept the permissions again. After hitting continue, I was logged into webtop!


For now, it looks like everything is working. I will most likely do a follow-up post when I start digging into domain level. If I understand correctly, domain level will allow me to create 1 provider and 1 application that covers everything. I lose some finite controls using this method, but I think it’s worth testing for the general user’s sake.
I’ve also submitted PR’s to our (linuxserver.io) repos, to include these for everyone.
Add includable authentik confs by drizuid · Pull Request #331 · linuxserver/docker-swag (github.com)